Assignment 9: Squeezing Pictures
Goals: Build a highly specialized image editor with mutable state, an advanced resizing algorithm, and (if you want a challenge) undo.
import java.util.ArrayList; import tester.*; import javalib.impworld.*; import javalib.worldimages.*; import java.awt.Color;
You will submit this project in two parts:
Part 1: Friday, March 28th at 9:00pm
Part 2: Friday, April 4th at 9:00pm
Start this project early! There is a lot of open-ended design to figure out here, so don’t leave the coding to the last minute...
Squishing the picture
We will be building an image editor that supports seam carving to reduce the size of images. Seam carving is a technique for reducing the dimensions of an image while avoiding removing salient detail. This editor should be able to reduce the vertical and horizontal size of images, and it would be nice to support an undo operation (this last bit is not required).

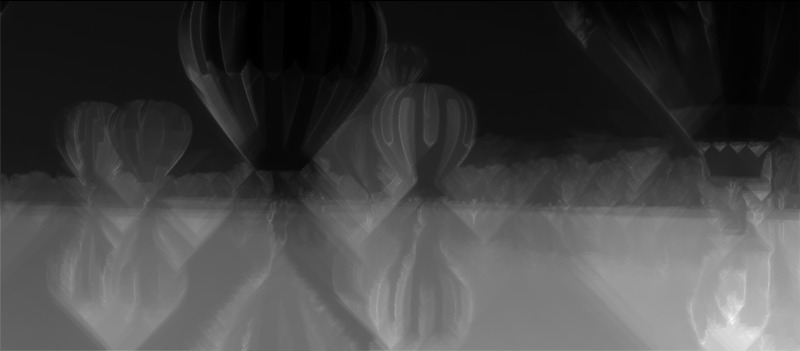
Suppose we want to embed the above picture in this assignment, but want to make it fit the page. Moreover, we want to keep all of the detail. There are several ways we could do this: we could simply squish the image horizontally until it “fits” the size we need, but that has the unpleasant effect of making everything look unnaturally squashed and elongated. In the image below, compare how squashed the balloons are with their shapes in the original image above.

We could crop the image and keep only a portion of it, but that potentially deletes lots of interesting parts of the image. In the image below, look in particular at the big blue balloon on the right.

Another idea is to look through all the columns of pixels in the image, and find the “most boring” column and remove it...then do this repeatedly until enough columns have been deleted to make the image fit. This almost works, but it’s rare that a single vertical column of pixels is ever boring enough: for example, if we have a picture of a long straight road heading off into the distance, then deleting a column will make an ugly “break” in the edge of the road, which as humans we’ll notice as “looking wrong.” In the image below, look in particular at the red balloon in the corner, and the river bank to the right of the middle group of balloons.

A refinement of this idea generalizes from a vertical line of pixels to a seam, which is a connected line that can zig-zag a bit if necessary, to avoid causing ugly breaks. Specifically, we’ll define a numerical notion of how “important” a single pixel is, then define a way to compute how important a seam is, and finally, delete the least important seam. In the image below, it’s hard to pinpoint where the edits have been made, but they have only removed the sky, and none of the balloons.

(Obviously, all this discussion applies equally well to images that are too tall and need to be shrunk vertically, by deleting “boring” horizontal seams.)
The first half of this assignment will see you implementing the basic underlying functionality of the editor, finding and removing vertical seams. Then, you will remove seams that go horizontally, as well as implement an undo feature to reinsert seams that were previously removed (again, this last bit is optional).
This assignment can be broken down into smaller tasks: seam finding, seam removal, and user interaction in the imperative world. Part 1 will largely consist of basic seam operations (finding and removing seams) while Part 2 builds on this.
Infrastructure
In this assignment, you’ll be working with images from files, so you’ll want to use FromFileImage to load them. From there, you can work with them just as you do other images. Additionally, you can query the image to get the Color of a given pixel using the getColorAt(int x, int y) method.
You’ll also be constructing new images, a pixel at a time. For this you will use a ComputedPixelImage. This kind of image has two useful methods: setPixel(int x, int y, Color c) that allows you to set an individual pixel, and setPixels(int x, int y, int width, int height, Color c) that allows you to fill an entire rectangle’s worth of pixels with a single color.
Finally, as you construct various examples of images, you may want to save them as files. For this you can use the method saveImage(String filename), which will save the current WorldImage or WorldScene as a PNG file. You may want to use this to make test cases for yourself.
Images as graphs of pixels
Once you’ve loaded an image, you should construct a grid of Pixel objects. Each Pixel should store its color and references to its four neighbors; you may also choose to add more fields to this class. (This grid looks something like a two-dimensional version of a Deque.) In addition to these four direct neighbors, each Pixel ought to be able to access its diagonal neighbors as well. Hint: you should enforce a well-formedness condition on your grids, to ensure that they always make sense – for example, that every pixel’s left-neighbor’s upper-neighbor is the same as its upper-neighbor’s left-neighbor, and similarly for the other three diagonals. This structural invariant should be something you preserve throughout this project, and is something you can (and should) test for.
![]()
Having this grid of Pixels allows us to think of the image as a graph, and now we can formulate the idea of seam carving more simply: Can we find a connected path from one side of the graph to the other, of minimal “energy” or interesting-ness, and remove it from the graph?
Pixel Energy
There are lots of ways to define the “energy” of a pixel. For this assignment: start by defining the brightness of a pixel as the average of its red, green and blue components, divided by 255.0 to get a double between 0 (corresponding to black) and 1 (corresponding to white).
Next, the horizontal energy and vertical energy of a pixel can be defined as how much the three left neighbors of a pixel differ from the three right neighbors (or the top from the bottom). Suppose we have nine pixels in a 3x3 grid:
\(HorizEnergy(E) = \left(br(A) + 2br(D) + br(G)\right) - \left(br(C) + 2br(F) + br(I)\right)\)
\(VertEnergy(E) = \left(br(A) + 2br(B) + br(C)\right) - \left(br(G) + 2br(H) + br(I)\right)\)
\(Energy(E) = \sqrt{HorizEnergy(E)^2 + VertEnergy(E)^2}\)
This last formula is the final one we’ll use as the total energy of a pixel.
Important: for pixels on the edge of the image, pretend the image is surrounded by a 1-pixel border of black pixels.
Seam Finding
Let’s consider vertical seams first. A vertical seam starts at a pixel on the top edge of the image, then at each row continues either diagonally to the left, straight down, or diagonally to the right until it reaches the bottom edge of the image. Every seam has an energy, which is simply the sum of the energies of its pixels. Our goal is to find the seam with minimum possible energy. How?
Define a class SeamInfo, that contains three fields: a Pixel that this information corresponds to, a double totalWeight for the seam so far, and a SeamInfo cameFrom that describes the seam up to this point. (In the base case, this cameFrom field is null, and this corresponds to the first pixel in the seam.) SeamInfo objects therefore form a linked-list, describing all the pixels in the seam.
This style of algorithm, which is heavily accumulator based and requires some clever insight, is known as dynamic programming. You’ll learn plenty more about these kinds of algorithms in your Algorithms and Data Structures class.
Repeat this process for each row in the image. When you’re done, you’ll have constructed one SeamInfo for every pixel. Find the SeamInfo with the minimum totalWeight in the last row: congratulations, you’ve found the end of the cheapest seam in the image! Follow its cameFrom links backward, and you’ll have found every pixel in that seam.
In the extremely unlikely case that you have a tie, and two seams have equal energy, choose the one whose last pixel is leftmost.
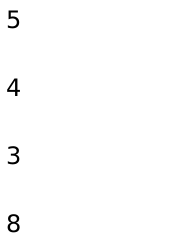
For example, suppose we have the following grid of numbers (representing pixel energies):
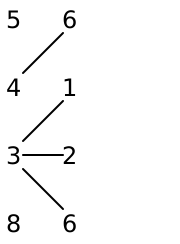
Let’s scan through this, one row at a time, looking for the cheapest total weight from the current row to the top, adding lines connecting each pixel to the cheapest neighbor above it as we go:
Row 1 |
| Sum weights, add row 2 |
| Sum weights, add row 3 |
| Sum weights, add row 4 |
| Sum weights |
|
|
|
|
|
|
|
|
|
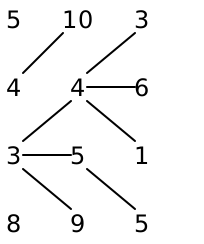
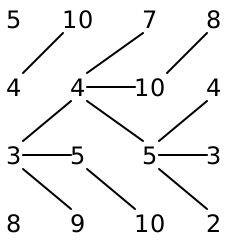
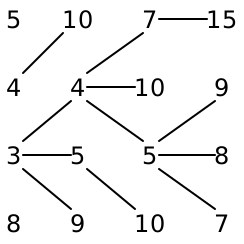

Looking at each number in the last row, we get 14 11 10 7. The cheapest number here is 7, so we obtain the seam whose pixels are 3 1 1 2. (Note: the pixels come from the original grid, rather than these summed total weights.)
Do Now!
Given this description of computing seams, is it possible for two vertical seams with distinct start and end pixels to intersect? Why or why not? Is it possible for two seams with different ending pixels to merge?
To visualize this for a large image, like the balloon picture above, we can draw a picture that shows the total energy of the cheapest path to each pixel as the brightness of that pixel. If we do this to the balloon picture, we get
(Notice the downward triangles: since (1) darker colors are lower energy, (2) we allow for diagonals, and (3) we pick the minimum energy of the three top neighboring pixels, it makes sense to see that lower-energy regions spread out along those diagonals, and crowd out the high-energy regions.)
All this discussion applies equally well to horizontal seams: we proceed from left to right, looking at the three left neighbors instead of the three upper neighbors, but the process is otherwise identical. For the same grid of numbers,

we would get
Col 1 |
| Sum weights, add col 2 |
| Sum weights, add col 3 |
| Sum weights, add col 4 |
| Sum weights |
|
|
|
|
|
|
|
|
|


Looking at each number in the right column, we get 15 9 8 7. The cheapest number here is 7, so we obtain the seam whose pixels are 3 1 1 2. (Note: again, the pixels come from the original grid, rather than these summed total weights.)
Seam Removal
Now that we know what seam has the lowest energy, we want to remove it from the picture. We already know from Deques how to remove a node from the middle of a doubly-linked list: tell the neighbors on either side of this node to point to each other instead of to this node. “All” we need to do here is do the same thing, but in two dimensions. Each of our pixels knows its four neighbors, so we simply need to ask each pixel in the seam to tell its neighbors to refer to each other.
Consider two adjacent rows of pixels, and the two seam pixels in those rows. They might be directly above each other, or diagonal from each other. When they’re vertical, fixing up the neighboring pixels is easy. When they’re diagonal...things get trickier. Draw yourself several object diagrams to sketch out the before and after results of what should happen here. Test carefully! (This is the trickiest part of this assignment.) Remember your structural invariant from before: it will help you check whether you’ve successfully removed a seam from the image.
Removing Many Seams
Once you’ve removed a seam, you’re left with a rectangular graph of pixels, so repeat the process of (re)computing pixel energies, constructing SeamInfos, and finding a minimum path through the graph.
(Note: most of the pixels will have the same energy as before. But the pixels adjacent to the seam you just removed will have new energies, and this can easily affect the computation of seams. Optimizing this redundant computation is harder than it seems, because the changed energy of a single pixel might “fan out” over the next rows to affect the seams in many nearby pixels. Please don’t try to prematurely optimize your code here: it’s ok to recompute things, if it helps ensure your code is correctly designed!)
What to submit
For Part 1, you need to complete computing the minimum vertical seam from an image, removing it, and rendering the resulting image. Moreover, you should build a world program that, on every tick, computes the minimum seam of the current image and removes it. (This should give an animation of a steadily shrinking image.)
For Part 2, you need to complete computing horizontal seams as well and removing those. Your animation should randomly choose between removing horizontal and removing vertical seams.
(Simple) Instead of removing a seam on every tick: on the first tick, compute a seam to remove and paint it red, then on the second tick remove it. On the third tick find the next seam and paint it red, and on the fourth tick remove it, etc. This should highlight the seams being removed, so we can see what’s being computed.
(Simple) Allow the user to pause and unpause the automatic removal of seams (via pressing the spacebar). Allow the user to choose to remove a vertical or horizontal seam (via pressing “v” or “h” accordingly).
(Medium-simple) Allow the user to toggle between seeing the actual image pixels and the energies of each pixel, in grayscale from 0 (black) to 1 (white).
(Medium) Allow the user to toggle between seeing the actual image pixels or the cumulative weight of each seam, in grayscale from 0 (black) to whatever the maximum energy is (white).
(Hard, but very cool) You should also be able to reinsert the removed seams, in the reversed order from which they were removed, to “inflate” the shrunken image back to its original size. (Note that for this to count as extra credit, you may not just save the intermediate images and draw them again: you need to actually, correctly manipulate the graph of pixels to reinsert them.)