Assignment 10: The Easy Animator: Part 2
The Easy Animator: Part 2: Let there be Motion!
You are to complete this project with the same partners as on the previous assignment.
In this assignment will implement two views for your model from the last assignment. A view is responsible for rendering (some or all of) the data in a model in a form that is understandable to whoever is actually trying to use the data.
Working in pairs
If you are working with a partner, please make a plan, talk frequently and tackle the assignment in a systematic manner. Dividing the work and then meeting directly the day before it is due is a recipe for disaster. This assignment requires you to self-learn some things, so enforce each other’s efforts and learning.
You can and should refactor or otherwise make improvements to your model from Assignment 9 as needed. Please document what changes you make and the reason for each change in your README. If you submitted an UML diagram please update it accordingly.
Views
In this assignment you will work on two views for your Easy Animator application.
As with the model, in the abstract sense, a view is an interface; particular concrete views implement that interface. Accordingly, your work in this assignment should carefully distinguish between any one particular implementation of a view and the common interface to which they should all adhere. Moreover, if your model from the previous assignment failed to have a similar interface/implementation split, you must fix that.
View interface(s)
Start by planning your views, and observing which operations you need. Although different views look and behave differently, there are some common aspects to all views. The design of the actual interface(s) is left up to you. A common design technique is to have a view interface that has all functionalities and then individual views suppress or provide defaults for functionalities they do not implement. Another relevant design rule is from the SOLID principles: Interface Segregation (No client should be forced to depend on methods that it does not use). Think about these aspects as you come up with a design for your views.
Speed of animation
In order to produce an animation, your views may need to convert the animation from unitless “ticks” to actual time durations. This can be controlled by specifying a tempo for the animation, in ticks per second. Thus the same animation can be produced at different speeds, by altering the tempo. This tempo will be supplied as a command-line parameter; see below.
A textual view: seeing is believing
This view will show a textual description of the animation. This description should be the description you produced in the previous assignment. To facilitate testing, this view should work with a variety of output sources.
For example the output of the text view for the textual output of the small demo animation from the previous assignment should be as follows:
Create red rectangle R with corner at (200,200), width 50 and height 100 Create blue oval C with center at (500,100), radius 60 and 30 R appears at time t=1 and disappears at time t=100 C appears at time t=6 and disappears at time t=100 R moves from (200,200) to (300,300) from time t=10 to t=50 C moves from (500,100) to (500,400) from time t=20 to t=70 C changes from blue to green from time t=50 to t=80 R moves from (300,300) to (200,200) from time t=70 to t=100 R changes width from 50 to 25 from time t=51 to t=70
1 Visual Animation view
In this view, you will draw and play the animation inside a window, effectively reproducing the sample animations shown in the images in the previous assignment description.
1.1 Producing shapes within an animation: Tweening
Each kind of animation can be thought of as changing some attribute of the shape with time. For example, moving a shape changes its position while keeping color and size unchanged, while changing the color does not change its position and size.
Each such kind of animation is specified by how the shape is before it starts, and how it is after it ends. For example, consider moving a rectangle R from its position (min-corner) A at time \(t = t_a\) to another position B at time \(t = t_b\). The “initial state” of R at time \(t = t_a\) is when it is at point A and the “final state” of R at time \(t = t_b\) is when it is at point B. The animation should show R moving from A to B smoothly. This requires us to compute the intermediate state of R at any time \(t_a \leq t \leq t_b\). This is called “in-betweening” or “tweening” (yes, an invented word!).
We can accomplish tweening in a simple manner using linear interpolation. Consider a variable f whose value is ‘a’ at time t=0 and ‘b’ at time t=1. Then its value at any time \(0 \leq t \leq 1\) is given by \(f(t) = a(1-t) + bt\) (verify its values at \(t=0\), \(t=1\) and \(t=0.5\)). Generalizing to any time interval \((t_a,t_b)\):
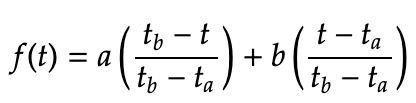
for any \(t_a \leq t \leq t_b\)
We can apply this formula to any attribute of a shape. For example, we can apply it to the x and y coordinates to interpolate position, or the red, green and blue components (r,g,b) to interpolate colors.
(Mathematically, linear interpolation can be visualized as drawing a line segment from a to b, and then thinking about how the values change uniformly.)
1.2 Implementation Details
To implement this view, you will need to use Java Swing. (You are not permitted to use Java’s other GUI library, JavaFX; it is overly complicated for our purposes.) Refer to the previous week’s Lecture or the code provided at the top of the page to give you a basic beginning using Swing. Some hints:
You will likely need to look up documentation on Graphics class, and you may need to explicitly cast Graphics objects to Graphics2D objects.
Swing defines three template methods by which you can customize the size of panels or frames: getMinimumSize, getPreferredSize and getMaximumSize. Of these, the most common to override is getPreferredSize.
Normally a GUI draws itself whenever it is asked to, or when certain events occur (e.g. maximizing or resizing the window). In order to produce an animation, you need some mechanism (similar to an alarm clock) to tell the window to keep refreshing itself automatically.
1.3 Behavior of the visual view
The animation should start as the view is loaded, with no additional inputs from the user. The window may or may not be big enough to show the entire animation: you should use scroll bars to ensure that the user can see different parts. See JScrollPane for details.
If objects overlap during the animation, they should be drawn in the order in which they were created (specified as input).
1.4 The Controller
You would need to implement one or more controllers. Like views and models, controllers are best described as an interface, whose purpose is to mediate the interactions between the view and the model. Multiple implementations of controllers are possible — potentially a specialized one for every model/view pairing. However it is also possible to implement a single controller that works for all your views: it depends on your design.
Hint: Note that the speed of the animation for your visual view will be handled by the controller. The controller determines how often to refresh the view. If the speed of the animation is five frames per second, then the controller needs to fetch the shapes from the model and refresh the view every 200ms. You can look into the Java or Swing timer classes to help you accomplish this.
2 Assignment
Implement the views above and a controller/s. Place all the code of your views in the
cs5004.animator.viewpackage, and your controller in thecs5004.animator.controllerpackage.Document any further changes made to your models from the previous assignment: explain what was added, removed or changed (besides the package declaration), and why.
Running and Testing
Reading animation specifications from files
Switching among the views implemented above
3 Reading from files
The skeleton code above provides you with a utility class, AnimationReader, that can read the animation files supplied for you to use. (Note: these samples are not quite identical to the animated GIFs in the previous assignment description. But they’re very similar in spirit.) Because we do not know in advance what you’ve named your model, or precisely how your constructors work, AnimationFileReader in turn requires a AnimationBuilder<T> object that describes constructing any animation, shape-by-shape and motion-by-motion. Think of this builder as adapting from the model interface that the AnimationReader expects to the one your model actually has.
Implement this builder interface, where the T parameter should be specialized to whatever your main interface is named that describes an animation (likely your model):
import cs5004.animator.util.AnimatorBuilder; import cs5004.animator.util.AnimatorReader; public final class WhateverYourModelImplementationIsNamed implements YourModelInterface { ... public static final class Builder implements AnimationBuilder<YourModelInterface> { // FILL IN HERE } } You do not need to write any code to parse the input files directly. The given code will do the parsing for you. You will implement the AnimationBuilder interface to connect the given parsing code with your model.
Implement a factory of views, with a single static method that takes in a String name for a view—
“text” or “visual”— and constructs an instance of the appropriate concrete view.
4 The main() method
package cs5004.animator; public final class EasyAnimator { public static void main(String[] args) { // FILL IN HERE } }
This main() method will be the entry point for your program. Your program needs to take inputs as command-line arguments (available in your program through the argument args above). Review the documentation for command-line arguments in a Java program.
The command-line arguments will be of the form
-in "name-of-animation-file" -view "type-of-view" -out "where-output-show-go" -speed "integer-ticks-per-second"Characteristics of a valid input are:
Each pair of arguments (
-in "input-file",-out "output-file", etc.) may appear in any order (e.g. the-viewpair can appear first, followed by-inand so on)Each pair of arguments are ordered. That is, if the user types
-inthen the next input must be the name of an input file, and so on.Providing an input file (the
-inpair) and a view (the-viewpair) are mandatory. If the output set is not specified and the view needs it, the default should be System.out. If the speed is not specified and the view needs it, the default is 1 tick per second.
This main() method will be the entry point for your program. You will need to create an Application run configuration in IntelliJ that chooses cs5004.animator.EasyAnimator as its main class. In this run configuration, you can also specify command-line arguments, such as the file you want to read in, and the view name you want to use. The options for the view name are "text" and "visual".
Here are some examples of valid command-line arguments and what they mean:
-in smalldemo.txt -view text -speed 2: use smalldemo.txt for the animation file, and create a text view with its output going to System.out, and a speed of 2 ticks per second.
-in smalldemo.txt -view text: use smalldemo.txt for the animation file, and create a text view with its output going to System.out.
-in smalldemo.txt -speed 50 -view visual: use smalldemo.txt for the animation file, and create a visual view to show the animation at a speed of 50 ticks per second.
If the command-line arguments are invalid, the program should show an error message (see JOptionPane for how to open a popup error message) and exit.
5 Specifying command-line arguments through IntelliJ
You need to create an Application run configuration that chooses cs5004.animator.EasyAnimator as its main class. In this run configuration, you can also specify command-line arguments. When you run the program normally, it will use these command-line arguments.
6 Testing
You should be able to test your text-based view sufficiently by parameterizing it over alternate input and output sources.
Unit-testing the visual view is not required. Unit-testing the text-based views is required.
Submission
Submit any files created or modified in this assignment. We should be able to run your program successfully using files in your submission.
Submit a text README file explaining your design. Make sure you explain your design changes from the previous assignment. If you submitted an UML diagram please update it accordingly.
Submit a file named
text-transcript.txt, showing the output of the console view when rendering thetoh-3.txt.Submit a JAR file (with extension
.jar) file that can run your program —see below for instructions. Your directory structure should be the same as in prior assignments —
a src/directory and atest/directory —plus a third directory named resources/containing your README, your JAR file, and the text transcript.
Go to File -> Project Structure -> Project Settings -> Artifacts
Click on the plus sign
Choose
JAR-> From Modules with dependencies. You should now see
Select the main class of your program (where you defined the main(String[] args) method)
If you see a checkbox labelled “Build on make”, check it.
Hit ok
You should now see something like
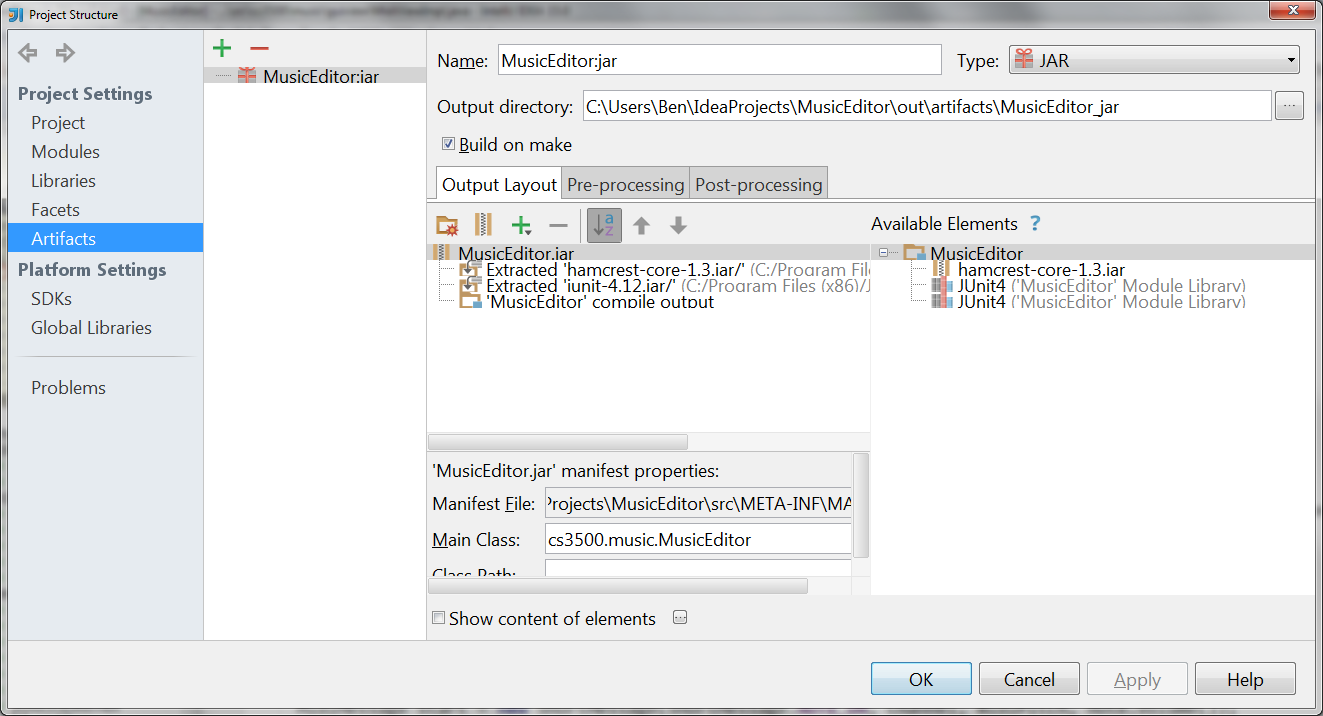
If now you see a checkbox labeled “Build on make,” or “Include in project build,” (it’s been renamed in recent versions of IntelliJ) check it now.
Make your project (click the button to the left of the run configurations dropdown, with the ones and zeros and a down-arrow on it). Your
.jarfile should now be in<projectRoot>/out/artifacts/.Verify that your jar file works. To do this, copy the jar file and your animation input files to a common folder. Now open a command-prompt/terminal and navigate to that folder. Now type
java -jar NameOfJARFile.jar -in smalldemo.txt -view text -out out -speed 2and press ENTER. The program should behave accordingly. If instead you get errors, review the above procedure to create the JAR file correctly. Note that double-clicking on your JAR file will not test it correctly, because your program is expecting command-line arguments.
Grading standards
the design of your view interface, in terms of clarity, flexibility, and how well it supports needed functionality;
how well you justify any changes made to your model,
the correctness and stylishness of your implementation
whether your program accepts command-line arguments correctly
whether your JAR file works correctly
the comprehensiveness and correctness of your test coverage.
Please submit your homework to https://handins.ccs.neu.edu/ by its specified deadline. Then be sure to complete your self evaluation.