Step by Step Instructions for Creating Your First Java Application in NetBeans 8.x
- Choose File / New Project. Under Categories, select Java. Under Projects, select Java Class Library. Click Next.
- Under Project Name, enter the name of your application. Change the Project Location to any folder on your computer.
- Click Finish. The IDE creates the project folder.
- Right-click the project node in the Projects window or Files window and select New > Other. Under Categories, select Swing GUI Forms. Under File Types, select JFrame Form. Click Next.
- Under Class Name, enter the name of your application. Leave Package blank for now (default package).
- Click Finish. The IDE creates the JFrame form in the specified package. The Form opens in the Design editor.
- IMPORTANT: Right click your
JFrame's background panel (not on any component or embedded panel), or
right click your JFrame in the Navigator panel, and choose "Set
Layout..." on the pop-up menu, then select "Null Layout".
- Add several components (click component, click on design panel; OR right-click on design panel and choose Add From Palette).
- Repeat step 7 as necessary (see below for instructions for specific components).
- To Run - Right click on
Projects.../<formname>.java
select Run File (or SHIFT-F6) (or click the green Run button).
What to turn in
- Zip your netbeans project directory and email, along with a screenshot of the app running, to is4300f15@css.neu.edu
Component-specific Instructions
to add icon images to buttons or labels, and have the image automatically bundled in your application's JAR file.
- Create an "images" package under your project's Source Packages in the Project pane (if you haven't already).
- Select the Icon... property of the component.
- The Icon property editor is displayed.
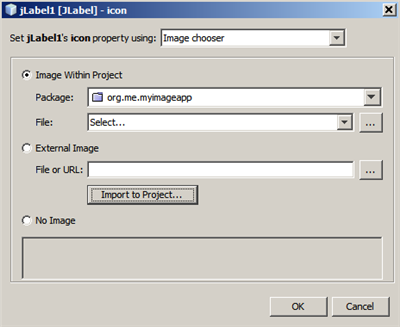
- Click Import to Project... and select the image you want to use off your system's hard disk. Click Next.
- In the Select target folder page of the wizard, select your images package folder and click Finish.
to populate a JComboBox
- First add the combo box to the panel. Then edit the 'model' property.
to add a Menu
1. First add a MenuBar to the JFrame.
2. Right click on the JMenuBar object in the Inspector, and select Add Menu (to add another menu.
3. To add items to a menu, expland the JMenuBar object in the Inpector, right click on the JMenu, choose Add From Palette > Menu Item
to add a nested JPanel
1. Add the Panel to Display.
2. Right click on the Panel and set the Layout to Null Layout.
3. Add contained components.