Assignment 6: The Music Editor: Second Movement
Due: Tue 03/21 at 8:59pm; self-evaluation due Wed 03/22 at 8:59pm
Starter files: code.zip
This assignment is to be completed with a partner. Please make sure
you’ve emailed Bryan Wehner (bwehner@husky) with both your usernames.
You will not be able to submit your homework without doing so
In this assignment will implement several views for your model from the last assignment. A view is responsible for rendering (some or all of) the data in a model in a form that is understandable to whomever is actually trying to use the data.
As with the model, in the abstract sense, a view is an interface; particular concrete views implement that interface. Accordingly, your work this week should carefully distinguish between any one particular implementation of a view and the common interface to which they should all adhere. Moreover, if your model from last week failed to have a similar interface/implementation split, you must fix that this week.
1 Harmonizing the models
Before you and your partner can begin working on views, you must first come to consensus on the design of your model.
Unify the designs of your models. Incorporate the best ideas from both, or any methods that one of you may not have thought of.
Refactor your model so that it resides in the
cs3500.music.modelpackage. Similarly, your tests should be incs3500.music.tests. If this requires correcting visibility on your code so far, fix it.Document any changes made to your models from the previous assignment: explain what was added, removed or changed (besides the package declaration), and why.
2 Views: Time to face the music
Once your models are reconciled, it’s time to see what they look like.
2.1 View interface(s)
Start by planning your views, and observing which operations you need. Although different views look and behave differently, there are some common aspects to all views. The design of the actual interface(s) is left up to you. Keep in mind the following SOLID principle from Lecture 1: Why object-oriented design?: Interface Segregation (No client should be forced to depend on methods that it does not use). In other words you should avoid having a view that offers methods that are not relevant to any of its users. Keep this in mind as you come up with a design for your views.
2.2 A textual view: seeing is believing
Implement the textual view from last week’s assignment, as a proper view: here, the view is shown rendering Mary Had a Little Lamb.
╔══════════════════════════════════════════════════════════════════════════════════╗
║    E3   F3  F#3   G3  G#3   A3  A#3   B3   C4  C#4   D4  D#4   E4   F4  F#4   G4 ║
║ 0                 X                                            X                 ║
║ 1                 |                                            |                 ║
║ 2                 |                                  X                           ║
║ 3                 |                                  |                           ║
║ 4                 |                        X                                     ║
║ 5                 |                        |                                     ║
║ 6                 |                                  X                           ║
║ 7                                                    |                           ║
║ 8                 X                                            X                 ║
║ 9                 |                                            |                 ║
║10                 |                                            X                 ║
║11                 |                                            |                 ║
║12                 |                                            X                 ║
║13                 |                                            |                 ║
║14                 |                                            |                 ║
║15                                                                                ║
║16                 X                                  X                           ║
║17                 |                                  |                           ║
║18                 |                                  X                           ║
║19                 |                                  |                           ║
║20                 |                                  X                           ║
║21                 |                                  |                           ║
║22                 |                                  |                           ║
║23                 |                                  |                           ║
║24                 X                                            X                 ║
║25                 |                                            |                 ║
║26                                                                             X  ║
║27                                                                             |  ║
║28                                                                             X  ║
║29                                                                             |  ║
║30                                                                             |  ║
║31                                                                             |  ║
║32                 X                                            X                 ║
║33                 |                                            |                 ║
║34                 |                                  X                           ║
║35                 |                                  |                           ║
║36                 |                        X                                     ║
║37                 |                        |                                     ║
║38                 |                                  X                           ║
║39                 |                                  |                           ║
║40                 X                                            X                 ║
║41                 |                                            |                 ║
║42                 |                                            X                 ║
║43                 |                                            |                 ║
║44                 |                                            X                 ║
║45                 |                                            |                 ║
║46                 |                                            X                 ║
║47                 |                                            |                 ║
║48                 X                                  X                           ║
║49                 |                                  |                           ║
║50                 |                                  X                           ║
║51                 |                                  |                           ║
║52                 |                                            X                 ║
║53                 |                                            |                 ║
║54                 |                                  X                           ║
║55                 |                                  |                           ║
║56  X                                       X                                     ║
║57  |                                       |                                     ║
║58  |                                       |                                     ║
║59  |                                       |                                     ║
║60  |                                       |                                     ║
║61  |                                       |                                     ║
║62  |                                       |                                     ║
║63  |                                       |                                     ║
╚══════════════════════════════════════════════════════════════════════════════════╝
Your output should be identical to that above, as was specified in Assignment 5. The frame surrounding the text above is not part of the rendering.
You may achieve this by moving your code to generate this rendering from the model to the appropriate view.
2.3 A visual view
Below is the visual view that you must replicate as much as possible:
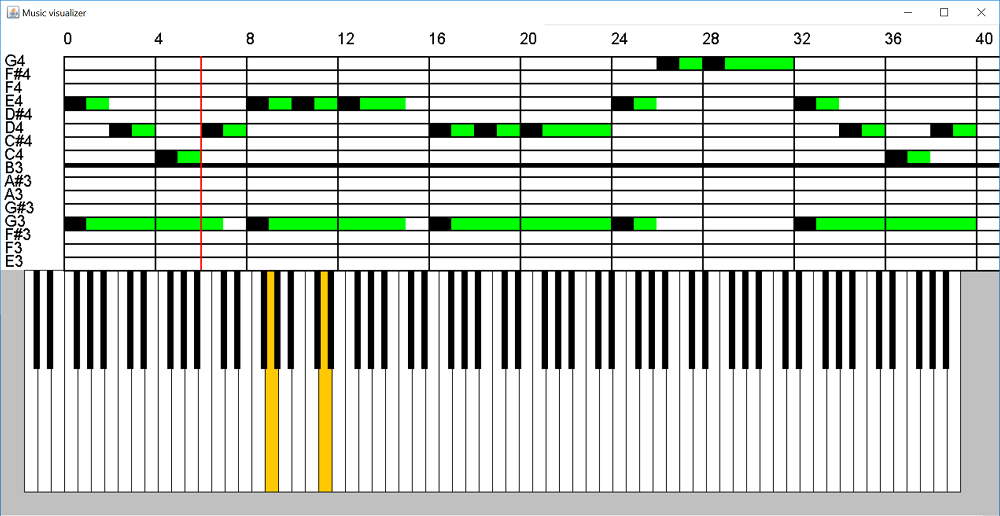
In the upper half higher pitches are higher vertically, and time increases to the right. Every row is a particular pitch, and beat numbers are marked at the top. In this piece, vertical bars mark measure lines every four beats. Here, the onset of a note is drawn black, while all remaining beats of the note are drawn green. You may adjust the visual styling in your own views, so long as the information is clear.
In the lower half is a keyboard layout. Each key on the keyboard corresponds to a pitch. The keyboard above shows 10 octaves. Please follow the keyboard map provided here to design this view accordingly.
To implement this view, you will need to use Java Swing. (You are not permitted to use
the javalib library we used in Fundies II, as it conflates the notions
of model, view and controller into a single World class. Additionally,
Java’s other GUI library, JavaFX, is overly complicated for our purposes.) The skeleton code provided
above and the examples from class give you a basic beginning using Swing.
You will likely need to look up documentation on
Graphics,
Panels
and Frames.
2.4 Behavior of the visual view
You should control the red line in this view using the left and right arrow keys on your keyboard. When the red line is at a particular beat, the keyboard should show which keys are pressed to play the notes being played at that beat (shown above in orange). You are free to choose any colors you want. The left and right arrow keys advance and go back by a beat respectively.
When the beat reaches the end of the range of the visible beats, the upper half should scroll accordingly. However this scrolling feature is optional for this assignment. You will have to implement this eventually, so you may choose to do so in this assignment itself.
2.5 An audible view: it’s playback time
Only the best musicians can simply glance at a score of music and hear it in their heads; the rest of us prefer to actually listen to the music. To this end, you’re going to use MIDI to play back your compositions. Java has support for MIDI as part of its standard library.
The skeleton code provided to you gives the basic outline for obtaining a reference to a MIDI synthesizer, obtaining from it a receiver, and sending that receiver instructions to turn a note on and off. You may be interested in the documentation on how to transmit and receive MIDI messages, and possibly chapters 8–11 in the guide as well.
Another viable option is to use the Sequencer setup, also included in the above
documentation.
2.6 Assignment
Implement the views above. Place all the code of your views in the
cs3500.music.viewpackage.Document any further changes made to your models from the previous assignment: explain what was added, removed or changed (besides the package declaration), and why.
3 Running and Testing
You probably want to run your code. This entails:
Switching among multiple input files (or pieces constructed entirely from code)
Switching among the views implemented above
3.1 Reading from files
The skeleton code above provides you with a utility class, MusicReader,
that can read the music files supplied for you to use. Because we do not know
in advance what you’ve named your compositions, or precisely how your
constructors work, MusicReader in turn requires a
CompositionBuilder<T> object that describes constructing any music
composition, note by note. Think of this builder as adapting from the model interface
that the MusicReader expects and the one your model actually has.
Implement this builder interface, where the
Tparameter should be specialized to whatever your main interface is named that describes an entire composition:import cs3500.music.util.*; public final class WhateverYourCompositionImplementationIsNamed implements YourCompositionInterface { ... public static final class Builder implements CompositionBuilder<YourCompositionInterface> { // FILL IN HERE } }
Implement a factory of views, with a single method that takes in a
Stringname for a view (e.g. “console” or “visual” or “midi”), and constructs an instance of the appropriate concrete view.
3.2 The main() event
Add the following class to your project:
package cs3500.music;
public final class MusicEditor {
  public static void main(String[] args) {
    // FILL IN HERE
  }
}
This main() method will be the entry point for your program. You need
to create an Application run configuration that chooses
cs3500.music.MusicEditor as its main class. In this run configuration,
you can also specify command-line arguments, such as the file you want to read
in, and the view name you want to use.
Complete the
main()method, so that running your program with arguments"mary.txt"and"console"will produce the text output above, and running it will arguments"mystery-1.txt"and"midi"will play the first mystery file via MIDI.
Congratulations, you now have a running Java program!
3.3 Testing
You still need to test your code. You should be able to test your text-based
view sufficiently by parameterizing it over alternate input and output sources.
We did the same thing in Assignment 3 —
You must implement a mock
MidiDevice
to emulate the default MIDI Synthesizer. It must implement at minimum the
getReceiver() method and return a mock
Receiver
that emulates actual MIDI receivers. This object in turn should log every call
to send(). Your mock classes should share a StringBuilder for
use as the log.
You must implement either a builder or convenience constructors for your MIDI
view, so that by default the view uses the actual MIDI synthesizer, but for
testing can be run with your mock instead. If you create a
StringBuilder, and pass to the mock-synth, you can then read out the
contents of the StringBuilder to confirm that you’ve played all the
right notes.
Hint: Remember that you are not testing whether Java’s Receiver, MidiDevice,
etc. are working correctly: they do. You are testing whether your program is using them correctly
to provide the correct inputs to these classes so that they may play them.
(How might you implement a similar mocking strategy for the graphical views?)
4 Grading standards
For this assignment, you will be graded on
the design of your view interface, in terms of clarity, flexibility, and how well it supports needed functionality;
how well you justify any changes made to your model,
the correctness and stylishness of your implementation, and
the comprehensiveness and correctness of your test coverage.
5 Submission
Submit any files created or modified in this assignment.
Submit a text README file explaining your design. Make sure you explain your design changes from the previous assignment.
Submit a file named
console-transcript.txt, showing the output of the console view when rendering themystery-1.txtfile.Submit a file named
midi-transcript.txt, showing the mocked transcript output of the MIDI view when renderingmary.txt.Submit a screenshot of your GUI view, rendering the
mystery-2.txtfile at beat 10. You must submit it as a JPEG, with file extension.jpg, or as a PNG, with file extension.png—and the file extensions are case-sensitive. Submit a JAR file (with extension
.jar) file that can run your program.Your directory structure should be the same as in prior assignments —
a src/directory and atest/directory —plus a third directory named resources/containing your README, your JAR file, and your screenshot.
To create a JAR file, do the following:
Go to File -> Project Structure -> Project Settings -> Artifacts
Click on the plus sign
Choose
JAR-> From Modules with dependencies. You should now see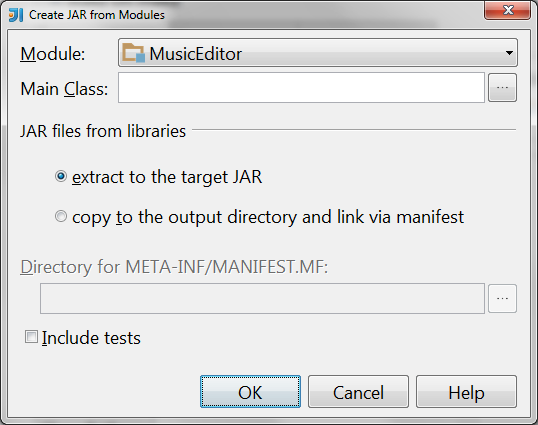
Select the main class of your program (where you defined the
main(String[] args)method)If you see a checkbox labelled “Build on make”, check it.
Hit ok
You should now see something like
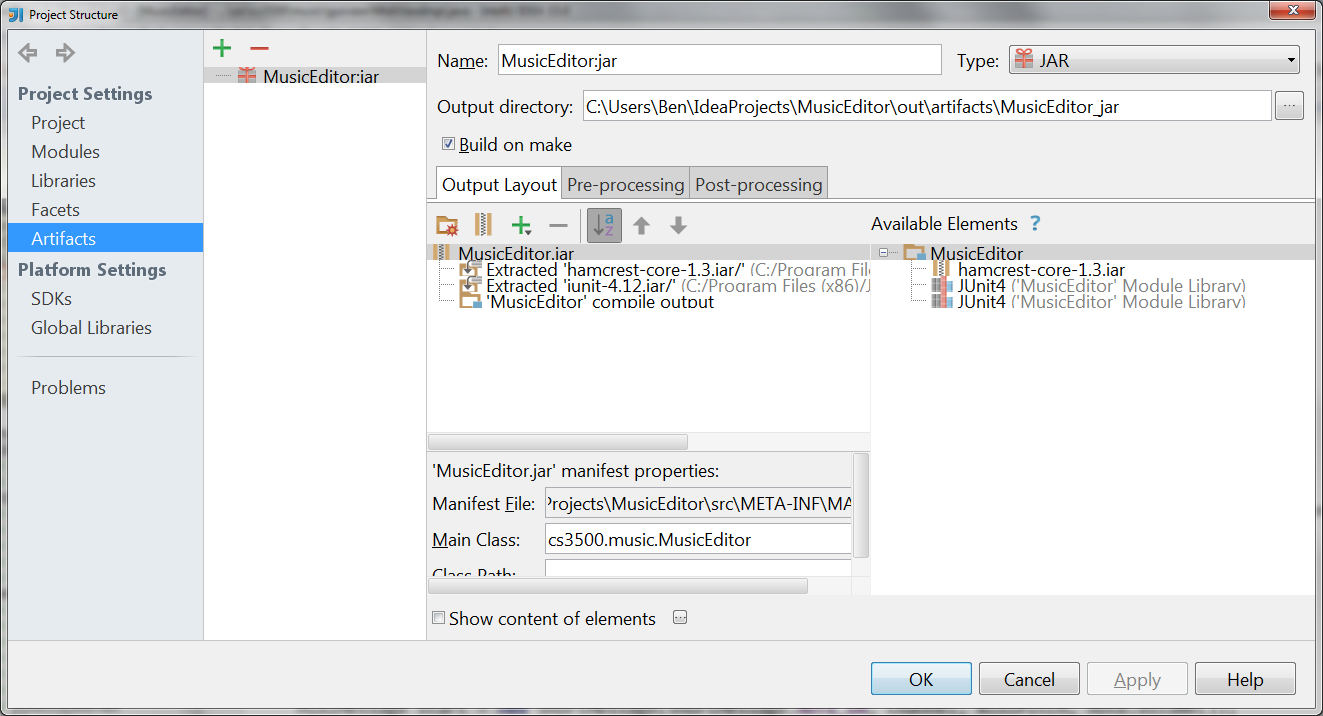
If now you see a checkbox labelled “Build on make”, check it now.
Make your project (the button to the left of the run configurations dropdown, with the ones and zeros and a down-arrow on it). Your
.jarfile should now be in<projectRoot>/out/artifacts/.Verify that your jar file works. To do this, copy the jar file and your music files to a common folder. Now open a command-prompt/terminal and navigate to that folder. Now type
java -jar NameOfJARFile.jar mary-little-lamb.txt visualand press ENTER. The program should behave accordingly. If instead you get errors review the above procedure to create the JAR file correctly. Note that double-clicking on your JAR file will not test this, because your program is expecting command-line arguments.
Please submit your homework to https://handins.ccs.neu.edu/ by the above deadline. Then be sure to complete your self evaluation by the second deadline.