Assignment 6: Flipping the Script – Reversi, part 2
Due dates:
Implementation: Tuesday, Nov 14 at 8:59pm
Self-evaluation: Wednesday, Nov 15 at 11:59pm
1 Purpose
In this portion of the project, you will be building a visual view of your game, and also start building the computer strategies for playing the game. This assignment has several parts. Look over the outline on the left, and skim through the whole assignment, before diving deeply into any one section. The assignment lists requirements in the recommended order you should do them, but future tasks might give you ideas for how to improve earlier ones.
2 Preparation: fixing up your models
2.1 Making your models read-only
As we discussed in class, views should not have the ability to mutate the models they are viewing: this would bypass the controller, making it impossible to reliably control the model.
Refactor your model interface, if necessary, into two interfaces: your
ReversiModel interface (or whatever you named it) should now extend a
ReadonlyReversiModel interface (again, choose a name that matches your
existing model). The read-only interface should contain all the observation
methods of your model, while the mutable sub-interface should contain all the
mutator methods.
2.2 Adding missing functionality
The following is a non-exhaustive checklist of functionality that is necessary for Reversi to work properly. Your model interface(s) may not yet expose all of these as methods, or might not make it easy to use.
Model setup:
The ability to create a board of a given size, in default initial state
The ability to create a copy of a board
Observations:
How big is the board?
What are the contents of a cell at a given coordinate?
Is it legal for the current player to play at a given coordinate?
What is the current score for either player?
Does the current player have any legal moves?
Is the game over?
Operations:
The current player makes a move at a given cell
The current player passes
Reexamine the design and implementation of your model from the previous
assignment, and improve it to include the functionality above. Document
whatever changes you made in a new section of your README, entitled
“Changes for part 2” —
(Note: the previous assignment did not define exactly what a player’s score should be. We will now decide that a player’s score is simply the number of tiles of their color that they currently have on the board.)
3 Visualizing the game
To implement your view, you will need to use Java Swing. (You are not
permitted to use the javalib library we used in Fundies 2, as it
conflates the notions of model, view and controller into a single World
class. You are also not permitted to use JavaFX, as that has been deprecated
and is overly complicated as well.) The code provided with the
MVC code and the
Turtles activity from class
give you a basic beginning using Swing, as well as the exercises in Lab ???.
You will likely need to look up documentation on
Graphicsclass, and you may need to explicitly castGraphicsobjects toGraphics2Dobjects. Also look at the “transform” methods available in theGraphics2Dclass to use the rendering canvas appropriately.Swing defines three template methods by which you can customize the size of panels or frames:
getMinimumSize,getPreferredSizeandgetMaximumSize. Of these, the most common to override isgetPreferredSize.
You will likely need to design at least one, and possibly two, interfaces for your view: one should describe what the frame ought to be capable of, and one might be needed to describe what the panel ought to be capable of. (These may be empty interfaces for now, if you do not see a need for any methods in them yet...but keep reading below for additional ideas.) Note that your textual rendering from the previous assignment does not have to implement this new GUI view interface, and you do not have to force it to do so.
3.1 Required appearance
Your view should look as much as possible like the screenshots shown in the previous assignment:
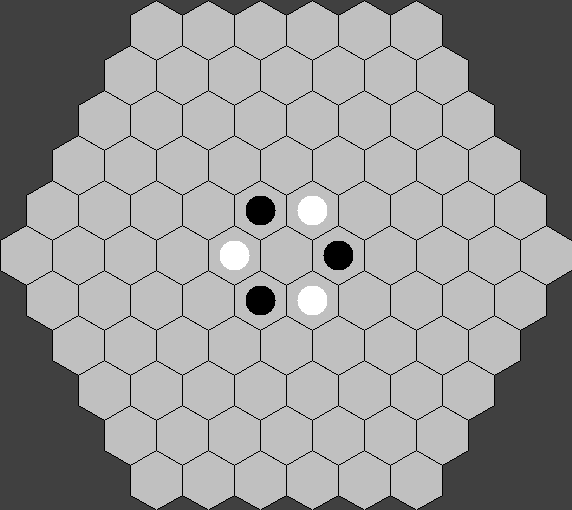
You may decorate the image if you wish, or adjust the color palette, but it should still be recognizably a Reversi board.
Looking through the documentation of the Graphics2D class, you’ll find
several useful methods for drawing text, lines, ovals, images, and shapes; and
for transforming the coordinate system (scaling, translating and rotating) to
affect where drawings are placed. We recommend building a subclass of
Path2D.Double that represents “a standard hexagon” of whatever size
makes sense in your view (this is somewhat analogous to the
HexagonImage
from the javalib library). You can then draw multiple such hexagons wherever
needed to make up your rendering: this will be much easier than attempting to
draw all the individual edges of the hexagons separately.
The same hex-grid
article as in the previous assignment will be helpful again.
3.2 Required behavior
Your view should have a constructor that takes in a ReadonlyReversiModel
—
In preparation for the next assignment (where you will build controllers), you should equip your view with the ability to handle mouse clicks. In particular, a user should be able to click on a cell of the board, and it should highlight:

Additionally, your view should (temporarily) print a message (using
System.out) containing the logical coordinates of the cell that was
clicked on, in whatever coordinate system you used in your model. Note:
this is not the same thing as the physical mouse coordinates of the
mouse event!
Your view should let the user deselect a selected cell by (1) clicking on it again, (2) clicking on another cell (in which case you should select that new cell), or (3) clicking outside the boundary of the board. Clicking outside the boundary of the board must not cause your view to crash, throw an exception, or otherwise break.
Your view should also allow the user to indicate they want to move in a particular cell, or to pass, by handling keyboard input. You may choose what keyboard interactions correspond to moving or passing, but be sure to document them in your README.
You may want to revisit the discussion of Features interfaces from
Lecture 15: GUI Basics, and this may influence your view interface designs.
3.3 Running your view
Add the following placeholder class to your project:
package cs3500.reversi;

public final class Reversi {
  public static void main(String[] args) {
    YourModel model = ...create an example model...
    YourView view = new YourView(model);
    view.setVisible(true);
  }
}
As we’ve done several times, our main() method simply instantiates a
model, instantiates a view using that model, and tells the view to get started.
In later assignments we will augment this to create controllers, players, and
make the game playable.
3.4 Testing your view
Testing views can be quite tricky, since you cannot simply use JUnit assertions to check them for “equality”. For this assignment, you do not need to unit-test your visual view, but you should include in your submission at least three screenshots of your view:
At the start of the game
With a cell selected
At a non-trivial intermediate point of the game
Name the screenshots appropriately, so you and graders can easily tell what they represent.
4 Strategic computer players
Playing Reversi for any amount of time quickly leads to noticing a few key strategies for decent play:
Capture as many pieces on this turn as possible.
Better yet, avoid the cells next to corners: because you’re just giving your opponent the ability to get a corner on their next turn.
Better still, go for the corners: discs in corners cannot be captured, because they don’t have cells on their other side.
A fancier approach might choose the move that leaves their opponent in a situation with no good moves. (This approach minimizes the maximum move the opponent can make, and is known as a minimax strategy.) To calculate the "best" move an opponent can make, you must make some guess as to what strategy that opponent is using...and it might be any of these strategies we’ve seen so far.
(There are far more sophisticated strategies than these, but these will do for now!)
4.1 Required behavior
Implement the first of these strategies. If there are multiple moves that capture the same number of pieces, break ties by choosing the move with the uppermost-leftmost coordinate. (Note: this is not a good real-life strategy! But it will make your testing substantially easier to have a deterministic way of breaking ties.) If there are no valid moves, your player should pass.
Hint: Keep in mind that a strategy needs to know which player it’s trying to pick a move for!
You must test this strategy, and in particular demonstrate that it resolves ties correctly.
4.2 Extra credit
As we discussed with Tic Tac Toe, you can chain these strategies to form strategies of varying sophistication. A simplistic strategy would just use option 1; a smarter strategy might stack on options 2 and 3, as well. Some of these strategies may result in multiple, equally-good options: in case of such ties, again choose the move with the uppermost-leftmost coordinate.
Some of these strategies may result in no valid moves: you must figure out how to represent such situations and what they should (eventually) do in the model.
Implement as many of the strategies above as possible. Make sure that they can be recombined easily in various ways (and not just hard-coded in a fixed combination).
Hint: You may have an easier time implementing your strategies if you generalize their signature somewhat: Unlike the Tic Tac Toe strategies, where moves didn’t have a numerical value, moves here do have a potential score. The possibility of ties implies that your strategy’s signature should return more than just a single move possibility...
4.3 Testing your strategies
The elegant feature of strategies is that they are simply function objects, and so they are emininently testable. Build a collection of example games in known configurations, ask each strategy where it would choose to move for a given player, and check that the result is as expected.
If you’ve implemented multiple strategies, test them thoroughly: in particular, make sure you test scenarios that demonstrate the differences between them.
4.3.1 Mocking your model
One of the challenges of testing your strategies is that they depend on your model working correctly: the model needs to implement the complicated game logic of legality checking and scoring, and if those are buggy, your strategies may give unexpected results. But obviously, you can’t execute a strategy without some model object to examine!
In class we discussed mocks, that are stub implementations of interfaces that can give simulated answers and that can record a transcript of what methods were used. Here are two ideas for mocking your model; you should use these (and probably several more) to test your strategies:
How can you tell if Strategy 3 actually checked all six corners? Or if Strategy 1 actually checked all possible locations for potential moves? Mock your model to record a transcript of which coordinates were inspected by your strategy, and then test whether that transcript contains all the necessary coordinates.
How can you tell if Strategy 1 chose the most valuable location? Mock your model to lie about the legality of certain locations or the value of such moves, to force your strategy to think that only only a pre-determined move is valid, and then test that it indeed returns that move.
5 What to do
Refactor your model to split it into read-only and mutable interfaces.
Design your view interfaces, and then begin implementing your views.
Design your strategy interface(s) and implementation(s). Test them, using mocks of your models as necessary.
Update your README file to include explanations of all the new classes you’ve designed. Be sure to include a “Changes for part 2” section documenting what you changed from your initial design.
6 What to submit
Submit all your source and test files so far
Submit your updated README file
Submit the three screenshots demonstrating your view works as intended
Submit a plain-text file named
strategy-transcript.txtcontaining a transcript from your mocked model of your simplest strategy choosing a move for Black on the starting board configuration.Submit a JAR file (with extension
.jar) that can run your program.
To create a JAR file, do the following:
Go to File -> Project Structure -> Project Settings -> Artifacts
Click on the plus sign
Choose
JAR-> From Modules with dependencies. You should now see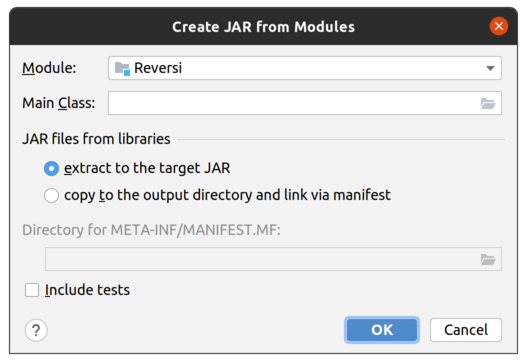
Select the main class of your program (where you defined the
main(String[] args)method)If you see a checkbox labelled “Include in project build”, check it.
Hit ok
You should now see something like
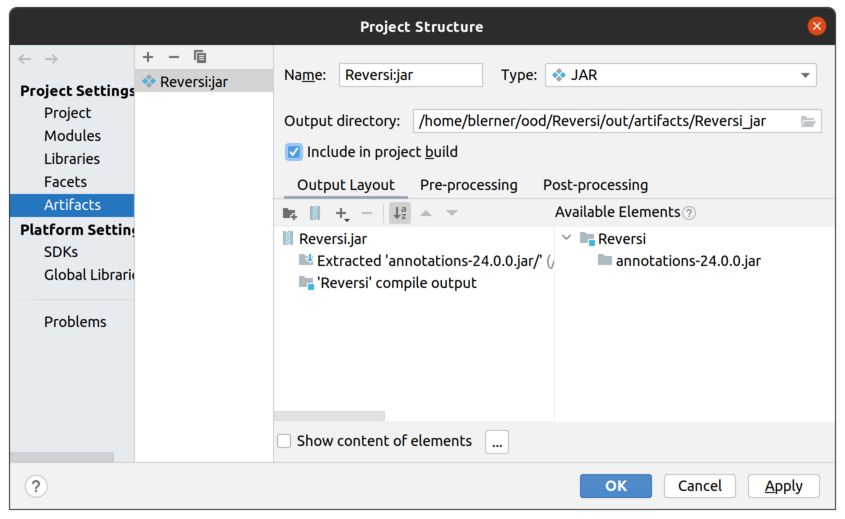
If now you see a checkbox labelled “Include in project build”, check it now.
Make your project (the button to the left of the run configurations dropdown, with the ones and zeros and a down-arrow on it). Your
.jarfile should now be in<projectRoot>/out/artifacts/.Verify that your jar file works. To do this, copy the jar file to some other folder. Now open a command-prompt/terminal and navigate to that folder. Now type
java -jar NameOfJARFile.jarand press ENTER. Your view should launch. If instead you get errors review the above procedure to create the JAR file correctly. Do not try merely double-clicking on your JAR, as that does not work consistently on different operating systems.
7 Grading standards
For this assignment, you will be graded on
the design of your view and strategy interfaces, in terms of clarity, flexibility, and how plausibly they will support needed functionality;
how well you justify any changes made to your model;
the forward thinking in your design, in terms of its flexibility, use of abstraction, etc.;
the correctness and style of your implementation, and;
the comprehensiveness and correctness of your test coverage.
8 Submission
Please submit your homework to https://handins.ccs.neu.edu/ by the above deadline. Then be sure to complete your self evaluation by its due date.