Assignment 7: The Music Editor: Third Movement
Due: Mon 11/21 at 8:59pm; self-evaluation due Tue 11/22 at 8:59pm
This assignment is to be completed with the same partner as Homework 6.
This week you will complete your music editor. You will need to implement one more view, and implement the controller for your editor.
Like views and models, controllers are best described as an interface whose
purpose is to mediate the interactions between the view and the model.
Multiple implementations of controllers are possible —
1 Implementing a controller
Your controller must allow the user to (at minimum):
Remove existing notes from a composition via some combination of keyboard and mouse
Add new notes of various lengths to a composition via some combination of keyboard, mouse and user inputs through the GUI
Scroll through a composition with the arrow keys (and scrollbars, if you have them)
Jump to the beginning or end of the composition, via the Home or End keys
Most likely, you have an
interface View, which is directly implemented by yourConsoleViewImpl,GuiViewImplandMidiViewImplclasses. Create a sub-interface GuiViewthatextends View, and refactorGuiViewImplto implement it. No existing code should break, if you’ve properly abstracted everything up to this point. Use thisGuiViewinterface to add GUI-specific methods that make no sense for the other view types, such as methods for dealing with keyboard and mouse.
The most important design constraint for your controller will be keeping the dependencies ordered the right way. In particular, the views should not know about the controller, even though you are implementing an asynchronous controller, where users supply inputs whenever they please, and the view must somehow inform the controller of that fact. Instead, the controller must inject its controlling actions as callbacks into the views. Let’s see how this works.
1.1 Handling the keyboard, generally
You may design your keyboard handler however you wish. Use
this
tutorial on writing a KeyListener to get started. Below we sketch one
particular design to get you started.
The general theme of handling the keyboard is quite uniform: every time a key
is typed, or pressed, or released, potentially do something depending on the
key. Keys are represented in Java as integers (because future keyboards may
add new keys, so using an enumeration is not possible). To keep your code
streamlined and yet extensible, this suggests building a
Map<Integer, Runnable> whose keys are the (character codes for the)
keys of interest, and the values are
function
objects representing what to do when that particular key is pressed. (If no
Runnable is present in the Map for a particular key, that
indicates nothing should be done when that key is pressed.) You may need three
maps, one for keys being typed, one for keys being pressed (i.e. held down),
and one for keys being released.
Design your keyboard handler:
Design a class
KeyboardHandlerthat implements theKeyListenerinterface.The
KeyListenerinterface is defined in terms of handlingKeyEventobjects, which unfortunately are not defined with an extensional equality or hashCode that work for us here. So instead of storingKeyEvents directly, give your class threeMap<Integer, Runnable>mappings from key-codes to the handler for that particular keystroke.Implement the
KeyListenermethods by looking up the relevant key in the relevant map, and if aRunnableis found, invoking it.Add methods to allow clients of your class (such as your controller) to install
Runnables for the various key events that are of interest.
Enhance your controller to create a
KeyboardHandler, and install as many key event handlers on that object as it needs to.
Congratulations: you’ve now implemented a miniature analogue of dynamic dispatch, where the handler code that runs is dynamically determined by inputs that are only available at runtime.
1.2 Mouse handling
Mouse handling involves a MouseListener interface, just as keyboard handling
involved a KeyListener.
Design a class that implements
MouseListener. It probably does not need to be as sophisticated and indirect as theKeyboardHandlerabove, since there are only three possible mouse events (left, middle and right clicks), rather than an entire keyboard.Enhance your controller again to create one of this mouse listener objects, and configure it however you need to.
Enhance your
GuiViewagain withaddMouseListener(MouseListener)(and possibly aremoveMouseListenertoo).
1.3 Organization of dependencies
Notice that the controller is telling the GuiView “please use the following
objects to react to events”, while the GuiView is advertising that it
is capable of reacting to mouse and keyboard events. The views don’t have to
know anything about what the controller wants to do with those events, or even
have a reference to the controller object directly. This ensures a looser
coupling between the controller and view, and allows the controller to freely
modify the keys it wants to handle without requiring changes within the view
(beyond the initial, generic ability to handle events in the first place).
2 Composite Views
Having visual and audible views completely separate seems unfortunate: it’s time to remedy that.

Design a new view that takes in both a
GuiViewImpland aMidiViewImpl. It should be able to start, pause and resume playback of the sound, and it should draw a red line that sweeps across marking the current beat. Once the current beat reaches the right-hand edge of the window, the whole window should scroll to bring the next measures of the composition into view.
This will assuredly require enhancing your view interfaces with new methods.
Consider carefully whether the new methods you design could plausibly be part
of the View interface, or only on the GuiView sub-interface.
To synchronize the sound and visual views, you will need some sort of common reference of time. Either both sound and visual synchronize with a common time, or one of the views synchronize with the other.
2.1 Assignment
Implement the controller, keyboard and mouse handlers, and the new view above. Place all the code of your views in the
cs3500.music.viewpackage, and the controller and handlers in thecs3500.music.controllerpackage.Document any further changes made to your models or views from the previous assignments: explain what was added, removed or changed (besides the package declaration), and why.
3 Testing
Testing KeyboardHandler is straightforward —Runnables that confirm that they’ve been
run.
Testing the mouse handling is harder (unless you designed a MouseHandler
to match the keyboard).
Testing the controller should be straightforward —
Complete any testing from the last assignment that you didn’t otherwise finish.
Hint: When you are testing each component above, be clear about what you are testing. The objective of testing the keyboard handler is to ensure that the appropriate action is taken on the appropriate key, not whether that action is successfully completed (that is part of testing the controller).
4 Grading standards
For this assignment, you will be graded on
the design of your entire project;
how well you justify any changes made to your earlier code,
the correctness and stylishness of your implementation, and
the comprehensiveness and correctness of your test coverage.
5 Submission
Submit any files created or modified in this assignment.
Submit a text README file explaining your design. Make sure you explain your design changes from the previous assignment.
Submit a screenshot of your composite view, rendering the
mystery-2.txtfile, and paused somewhere between beats 32 and 64. You must submit it as a JPEG, with file extension.jpg, or as a PNG, with file extension.png—and the file extensions are case-sensitive. Submit a JAR file (with extension
.jar) file that can run your program.
To create a JAR file, do the following:
Go to File -> Project Structure -> Project Settings -> Artifacts
Click on the plus sign
Choose
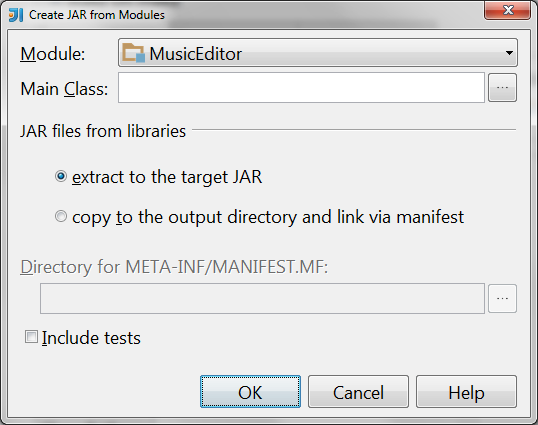
JAR-> From Modules with dependencies. You should now see
Select the main class of your program (where you defined the
main(String[] args)method)If you see a checkbox labelled “Build on make”, check it.
Hit ok
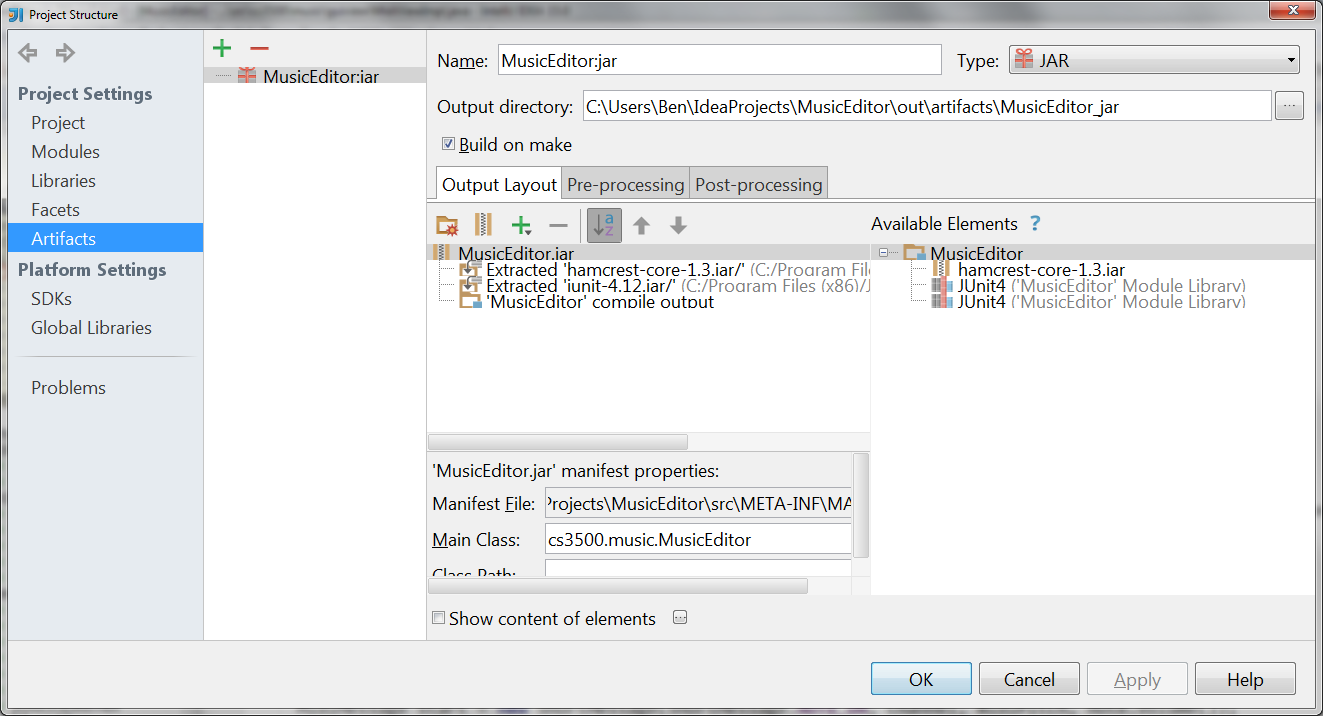
You should now see something like

If now you see a checkbox labelled “Build on make”, check it now.
Make your project (Go to Build -> Artifacts, select the jar artifact you created above, and select “Rebuild” for a full rebuild of the project. Your
.jarfile should now be in<projectRoot>/out/artifacts/.
Please submit your homework to https://cs3500.ccs.neu.edu/ by the above deadline. Then be sure to complete your self evaluation by the second deadline.