Assignment 5: Third Time’s a Charm – Three Trios, part 1
Due dates:
Implementation: Wednesday, Oct 30 at 8:59pm
Self-evaluation: Thursday, Oct 31 at 11:59pm
This assignment is to be completed with a partner. You must be signed up
with a partner on Handins from this assignment onward. You will not be able to
submit this and subsequent assignments until you are part of a team on Handins.
If you do not know (or remember) how to request teams, follow
these
instructions. Please request teams no later than the start of homework 5,
which is Oct 20 5pm Boston time —
Note that you will need to work with your partner to submit the self-eval. As with the code, one partner will submit a single self-eval for the team. However, you will likely need to sit with your partner or be on the phone as you should agree on all the responses.
1 Purpose
In this project, you will be building a two-player game with a graphical interface. The design and implementation of this game is left open-ended, for you to figure out, explain, and justify. There will be several components to this project, so do not assume that everything in your code must neatly be described as either “model”, “view”, or “controller”.
2 Three Trios gameplay
Three Trios is a two-player game played on a regular grid of cells and custom cards. The game is a variation
of an older card game called Triple Triad.
Each player has a color—
An initial layout of the game might look like this:
Note that in these screenshots, font size has been increased to ensure legibility at smaller image sizes.

To start the game, there must be enough cards to fill both players’ hands and fill every card cell. Therefore,
if N is the number of card cells on the grid, there must be at least N+1 cards available in the
game to split between the players.
With a valid grid and list of cards to play with, each player is dealt their cards at random from the list.
Each player’s hand is filled with exactly (N+1)/2 cards where N is the number of card cells on the grid.
Player Red goes first. On each turn, two phases occur: the placing phase and the battle phase in that order. In the placing phase, the current turn player (say player A) places a card in an empty cell. In the battle phase, that newly placed card does battle against the opposing player’s (say player B) adjacent cards. Any of player B’s cards that lose in the battle phase are flipped. This means they become player A’s cards but remain on the grid. After the battle phase, the turn changes over to the other player.
The game ends when all empty card cells are filled. The winner is determined by counting the number of cards each player owns both on the grid and in their hands. The player with the most owned cards wins. If no such player exists, the game is a tie.
In the following subsections, we will dive into the different components of the game and the explanation of the phases.
3 The grid
A grid is a rectangular container of cells. There are two types of cells in the game:
Hole: A dark space where no card can be placed.
Card Cell: A space that is empty or contains a card.
By utilizing holes, we can simulate non-rectangular grids like the image above. All card cells start as empty in the game. Over time, the cells will be filled with cards and associated with the player that owns that card. Note that card ownership can change over the course of the game.
We will be supplying the grid to the model via a configuration file in our implementation. See the relevant section later in the assignment.
4 The cards
Cards in the game of Three Trios consist of some unique identifier and four attack values. For our game, we will use names for a simpler proof of concept. The four attack values correspond to the four sides of the card. We will use compass directions to refer to each side (North, South, East, and West). Attack values in this game are the integers between 1-9 and the letter A, representing 10 from hexadecimal.
We will be supplying all the possible cards to the model via a configuration file in our implementation. See the relevant section later in the assignment.
5 Player Action
The current turn player must choose a card from their hand and place it in one of the empty card cells on the grid. As stated previously, this action is divided into two phases: the placing phase and the battle phase.
5.1 Placing phase
A play is legal for player A if the cell the card is being played to is not a hole and not occupied by another card. The result of a legal move is proceeding into the battle phase. Naturally, the card is also removed from the player A’s hand.
5.2 Battle phase
In this phase, the player A’s newly placed card enters battle. There are two steps to battle as well. Battle first occurs against all adjacent cards to the newly placed card that also belong to player B. When player A’s card does battle with player B’s card, they compare attack values in the directions they face each other. If player A’s card’s attack value in that direction is strictly higher than the opposing card’s attack power in the opposite direction, the opposing card swaps ownership to become player A’s.
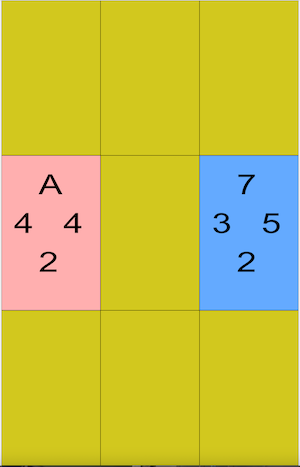
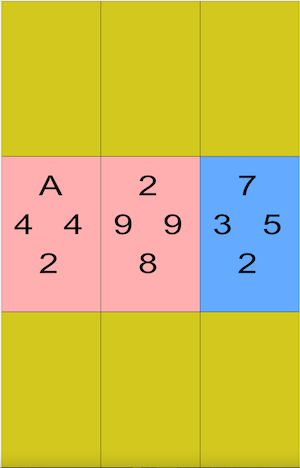
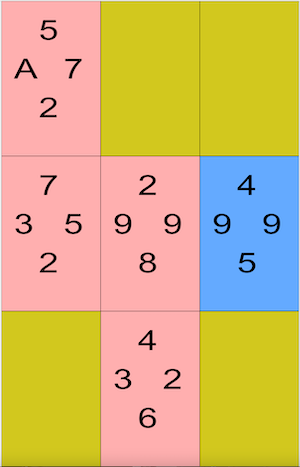
For example, consider the following pictures. Player Red first plays their card in the middle cell of the grid. Then the game looks to the adjacent cells in each direction. In this case, it ignores player Red’s own cards until it finds one of player Blue’s cards to the East. The game compares player Red’s East card value against player Blue’s West card value. Since player Red’s East attack value is 9 and player Blue’s West attack value is 3, player Red flips player Blue’s card. This results in the final image.
Before placing phase |
| After placing phase |
| After battle phase |
|
|
|
|
|
Player Red will play to the highlighted cell on the grid |
| Player Red's card appears on the grid |
| Result of the battle phase from player Red. Notice some of Blue's cards flipped |
All cards player A managed to flip now do battle with their adjacent cards that belong to player B, repeating the process. This is known as combo step. This combo continues until no cards are flipped.
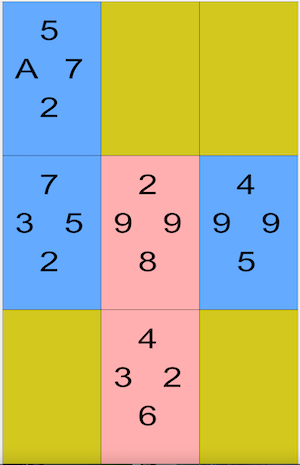
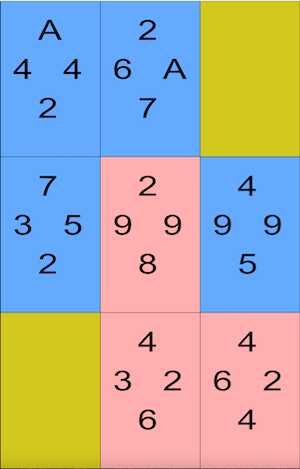
Consider the following images. In the first image, player Red has just played to the middle cell. The second image shows the end of the first step of battle. Notice one new card has been flipped, the one to the West of the newly placed card. Also notice the card to the East did not flip because East attack value of player Red’s card matched the West attack value of player Blue’s card. This shows the battle phase continues even if the current player’s card loses a battle.
Now the combo step begins with that newly flipped card in the West, resulting in the final image. This newly flipped card does battle with player Blue’s card to the North. Since the newly flipped cards’ North attack value is greater than the South attack value of player Blue’s card, player Blue’s card is flipped. Notice that the card flipped in the combo phase has no viable cards to do battle against. Since there are no newly flipped cards, the combo step ends. As a result, the battle phase ends.
Before first battle step |
| After first battle step |
| After combo battle step |
|
|
|
|
|
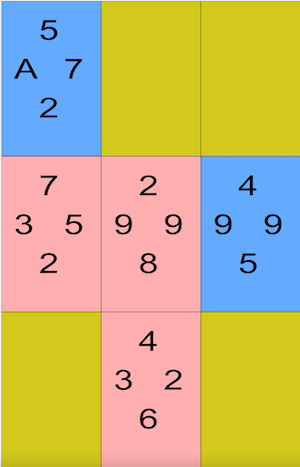
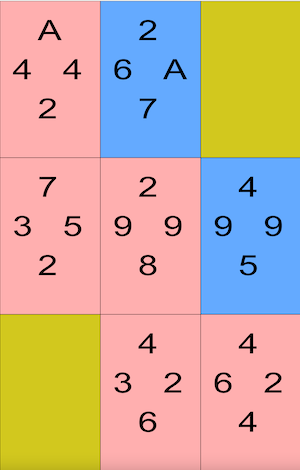
Now consider an alternate board like the left image below, where a more powerful player Blue card existed in the top row, middle column. Player Red then plays in the middle and the battle phase plays out, resulting in the state on the right. After player Red’s cards flipped the top left card, that top left card tried to battle the top middle card. However, the top left card loses the battle. Since the surrounding cards are owned by player Red, the combo phase and thus the battle phase ends.
Before battle phase |
| After battle phase |
|
|
|
6 Architectural choices
A multiplayer game involves several interacting components: you have multiple players, that each interact with a visualization of the grid, along with a rules-keeper to ensure the game is played legally.
In our setting, the cards, grid, and the rules-keeper comprise our model: together, they are what distinguish one instance of the game from another.
There are multiple ways to view the game; we will discuss two below.
Depending on how the game is viewed, we might want to design different controllers for the game.
The game also has some further customization not mentioned in the overview. Battle phases can be customized with variant rules that change when cards are flipped or even the attack values of cards.
And then there are the players, which are not part of the model, view, or controller. Players make decisions about what move they want to make (not be confused with the player entities in the model), so they “have a different interface” than the other components discussed so far.
6.1 Modeling the game
You will need to represent the cards, the hands, the grid, and all of their contents. You likely will have to figure out how to represent the coordinate system of the grid, so as to describe the locations of all the cells.
You will need to figure out how to let players make moves. Your implementation will need to (among other tasks) enforce the rules of the game, to make sure that players take turns, that moves are legal, that cards are flipped, and that the winner of the game can be determined.
About variant rules: While variant rules are briefly mentioned, they are not to be implemented as we have not discussed what they are. We mention them now in case that has an effect on how you design the model.
Hint: your primary model interface may not be all that complicated. As with all our design tasks so far, consider all the nouns you notice in this game’s description, and all the verbs describing their interactions, observations, or mutations, and those become your interfaces and methods.
6.2 Visualizing the game
You are not required in this assignment to create a GUI view of your
game. Instead, you will start with a simpler textual view, similar to the
previous project, to make it easier to see the interim progress of your game.
We recommend a straightforward rendering using _ for empty cells, ' ' for
holes, R for one player, and B for the other. This view should
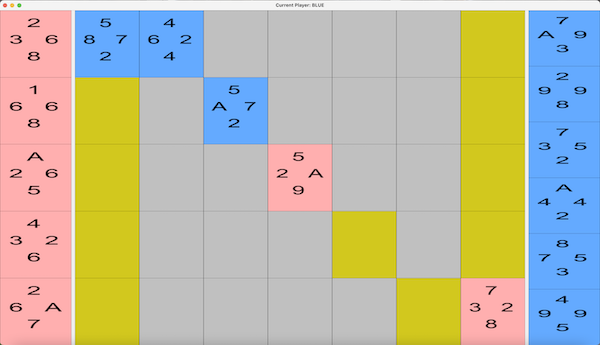
also focus on the current player in the model. For example, see the graphical
and textual views below for a representation of a game in play where player Blue is
the current player.
Visual view |
| Textual view |
|
| Player: BLUE BB _ _B _ _ R _ _ _ _ _ _R Hand: CorruptKing 7 3 9 A AngryDragon 2 8 9 9 WindBird 7 2 5 3 HeroKnight A 2 4 4 WorldDragon 8 3 5 7 SkyWhale 4 5 9 9 |
6.3 Controlling the game
You do not need to implement any sort of controller in this assignment, though
you are encouraged to think about how to do so —
7 Players – human or machine?
In a future assignment, we might ask you to implement a simple AI player for this game. This will enable several possible scenarios, including solitaire play (person vs computer) and fully-automated play (which may be useful for testing). You do not have to implement a computer player right now, but you should design your model so that different player implementations could exist for human or machines to play your game. You should attempt to design a player interface that allows this to happen.
In a design document (in a separate text file), explain how you envision instantiating players and your model, so that you could play a few moves of the game. This might be one part of your README (see below), but probably should be a separate file.
We will give additional guidance in future assignments over how we suggest you implement players; the goal in this assignment is for you to think through the design possibilities and explain what you think might be an appropriate design.
8 Reading Configuration Files
Configuration files are a great way of setting up game states without having to manually create them in a test file. We will be using configuration files to instantiate the grid and cards for our game. This files seemingly play a special role, but do belong in one of our 3 regular components (model, view, controller). You must decide where they go based on the purposes of each component and what the classes that read these files actually do.
If you get a file that does not correspond to either of the formats listed below, the behavior is unspecified. This means you can let anything happen as a result. If you do choose a specific behavior, make sure to document it in the code.
For both of these files, it may be helpful to read up on the FileReader
and Scanner documentation from Oracle. The goal is to help you practice some
software archaeology and help you figure out how you learn to use new classes.
Grid Configuration file The file’s format is as follows
ROWS COLS
ROW_0
ROW_1
ROW_2
...
ROWS and COLS are positive (i.e. &java{> 0}) integers representing the number of rows and columns in the grid represented in the file. The rest of the file are the rows of the grid from topmost to bottommost. Each row consists of COLS characters where each character is one of two
"X": This indicates a hole in the grid.
"C": This indicates a card cell. All card cells are presumed empty.
All lines following the last row are ignored.
What follows is an example grid configuration file, perhaps of a familiar logo.
5 7
CCXXXXC
CXCXXXC
CXXCXXC
CXXXCXC
CXXXXCC
Card Database File This file’s format is a list of cards
CARD_NAME NORTH SOUTH EAST WEST
CARD_NAME NORTH SOUTH EAST WEST
CARD_NAME NORTH SOUTH EAST WEST
...
Each line represents a single card in the game. Each line consists of 5 strings. The first string is the name of the card. The other 4 are the attack values of the card as defined above. Notice the direction order is fixed. This means the second string is always the North attack value, the third string is the South attack value and so on.
A valid card file only has lines of cards formatted as specified above.
9 What to do
Design a model to represent the game grid. This may consist of one or more interfaces, abstract classes, concrete classes, enums, etc. Consider carefully what operations it should support, what invariants it assumes, etc. Your model implementation should be general enough for multiple grid sizes.
Design classes to read in the card and grid configurations. This many consist of one or more interfaces, abstract class, concrete classes, etc.
You are required to identify and document at least one class invariant for the implementation of your main model class, and ensure that your implementation enforces it.
Document your model well. Be sure to document clearly what each type and method does, what purpose it serves and why it belongs in the model.
Write a README file (see below).
Implement your model. If some method of your model cannot be implemented because it requires details we have not yet provided, you may leave the method body blank for now —
but leave a comment inside the method body explaining why it’s empty and what details you’re waiting for. If your implementation makes additional assumptions about invariants (beyond those asserted by the interface), document them. Create 3 board files that are not examples shown anywhere in this specification of different dimensions and properties:
A board with no holes for easy testing
A board with holes where all card cells can reach each other. That is, if one were to walk over the grid and only step on card cells, one could walk from any singular card cell to any other card cell using only compass directions.
A board with holes where at least two groups of card cells cannot reach each other.
Create at least 2 card files to play a game of Triple Trios with any of the boards above.
One that has enough cards to play at least one of your boards, but too few for another board.
One that has enough cards to play the game on any of your boards.
Test your model thoroughly. You are encouraged to do the following : an Examples class to give readers a quick understanding of your model (like you did in HW1), a ModelInterface-testing class that lives outside your model package, to ensure you’re testing the publicly visible signatures of your model, and an Implementation-testing class that lives inside your model package, that can test package-visible functionality that isn’t part of your model interface.
Implement the textual rendering of your model described above, so we can visualize your data. Leave enough comments in your code that TAs know how to use your code to produce a visualization of a model. Test your textual rendering.
Design a player interface, such that human or AI players could interact with the model, and explain your design. You do not have to implement this interface for this assignment. You don’t even necessarily need to define this interface as a Java
interface, but merely as a clearly-written English description in a text file.
We will not be autograding this assignment, but you should emulate the textual view output above as precisely as possible, as we will likely be looking at it on future assignments.
10 How to write a good README file
A good README file needs to quickly explain to the reader what the codebase’s overall purpose is, what its design is, and where to find relevant functionality within the codebase. (Just because your code organization is obvious to you does not mean it’s obvious to a newcomer to your code!)
A README file does not have to be long in order to be effective, but it does need to be better than merely formulaic.
README files need to be in a predictable place in your codebase, or else
readers won’t easily be able to find them. Typically, place them in the
topmost directory of your project, or in a toplevel docs/ directory.
Consider the following outline as a good starting point for your READMEs, and elaborate from here. This is not a verbatim requirement, but rather a launch-point for you to explain your code.
Overview: What problem is this codebase trying to solve? What high-level assumptions are made in the codebase, either about the background knowledge needed, about what forms of extensibility are envisioned or are out of scope, or about prerequisites for using this code?
Quick start: give a short snippet of code (rather like a simple JUnit test) showing how a user might get started using this codebase.
Key components: Explain the highest-level components in your system, and what they do. It is trite and useless to merely say “The model represents the data in my system. The view represents the rendering of my system. ...” This is a waste of your time and the reader’s time. Describe which components “drive” the control-flow of your system, and which ones “are driven”.
Key subcomponents: Within each component, give an overview of the main nouns in your system, and why they exist and what they are used for.
Source organization: Either explain for each component where to find it in your codebase, or explain for each directory in your codebase what components it provides. Either way, supply the reader with a “map” to your codebase, so they can navigate around.
Notice that almost everything in the README file corresponds strongly with the purpose statements of classes and interfaces in your code, but probably does not get into the detailed purpose statements of methods in your code, invariants in your data definitions, etc. Those implementation details belong in Javadoc on the relevant code files. You may choose to mention some key methods as entry points into your code (perhaps in the Quick start section’s examples), but you should not overburden the README with such lower-level detail.
11 What to submit
Submit any files created in this assignment, along with your design document. Make certain you include your README file, which should give the graders an overview of what the purposes are for every class, interface, etc. that you include in your model, so that they can quickly get a high-level overview of your code. It does not replace the need for proper Javadoc!
12 Grading standards
For this assignment, you will be graded on
the design of your model interface(s), in terms of clarity, flexibility, and how plausibly it will support needed functionality;
the appropriateness of your representation choices for the data, and the adequacy of any documented class invariants (please comment on why you chose the representation you did in the code);
the choice of component for your classes that read files
the board and card files to play and test the game
the forward thinking in your design, in terms of its flexibility, use of abstraction, etc.
the correctness and style of your implementation, and
the comprehensiveness and correctness of your test coverage.
13 Submission
Please submit your homework to https://handins.ccs.neu.edu/ by the above deadline. Then be sure to complete your self evaluation by its due date.
