Assignment 9: Pawns on the World Stage – Pawns Board, part 5
Due dates:
Implementation: before your demo
Demo: schedule with instructors/TA
There is no self-eval for this assignment, though you will still submit it on the handin server. For evaluation, you will schedule a brief demo with one of the instructional staff. Available time slots will be posted on a Google document with a link on Piazza.
We prefer you complete this assignment with your partner, but if you need to work on it on your own, contact us in advance. We strongly prefer that you present your work together with your partner. If only one of you can attend, you must let us know in advance.
This assignment asks you to implement three sets of features for three levels of extra credit. Some levels may be dependent on each other. Each level is all-or-none: either it works perfectly or it doesn’t. However there are points in each level for designing well, in addition to working correctly.
All extra-credit functionality must be well-designed and tested, to the ability of that feature to be tested. (GUI functionality is hard to test directly, but any related interfaces or classes must be testable and tested.) Also, all extra-credit functionality must work simultaneously: you must not have to comment code out and recompile your program in order to enable different features. You may use different command-line arguments, toggleable menu items, or other UI choices to select among your features.
1 Level 0: High Contrast Mode
Operating systems tend to have a high contrast mode that makes the UI of programs easier to read for those with vision problems. We will make our game a little more accessible by creating a high constrast mode, but only on the board. (While it isn’t that difficult to also apply to the hand, the added work is not needed to reflect the skill being exercised here.)Our high contrast mode will be as follows:
The cells on the board must be pure black.
Text must be as bright as possible to pop out from the black on the board. This means if you were using black text on a cell, you must now use white. The colors of the players must be the pure red for Red and the cyan for Blue as well to differentiate themselves from the cells.
For cards and cells that were the player’s color, text on them must be pure black so they pop.
If you highlight a cell, you must make the color of the cell yellow. This also means the text on that cell must be changed to black for legibility.
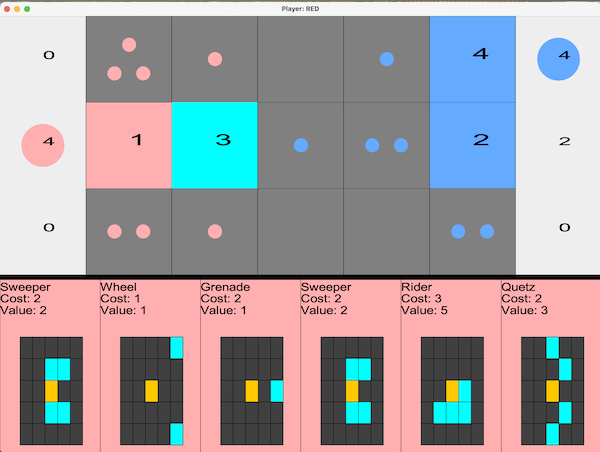
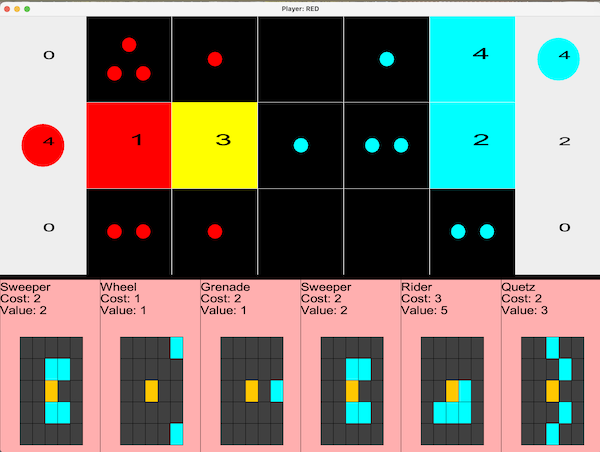
Below is an example of this high contrast mode of the example GUI. Notice that the highlighted cell remains highlighted after going to contrast mode.
Original |
| High-contrast |
|
|
|
High contrast mode must be enableable and disableable at runtime, and for each player
independently: you should not have to restart the game to turn hints on or off,
and (obviously!) if one frame is in high-contrast mode for one player, the other player’s
frame should be unaffected!
For proper design, you must not modify your rendering code directly to add
this coloring (e.g. add a flag that changes the color directly in the rendering code); it must be a separate class that you can add or remove. It may help you to know that if you
remove panels or components from a frame, you must call revalidate() to have
Swing run all of its layout calculations and then call repaint() to see the change.
2 Level 1: New Influence
In this level, you will reimplement a model that allows for two new types of influence: upgrading and devaluing. Without these new types of influences, the game becomes highly unbalanced.
2.1 Upgrading
The upgrading influence does not add pawns to a cell, but instead increases the present or future value of that cell by 1. This increase only effects the row-score once a card has been placed in that cell. Upgrading influence from multiple cards do stack, allowing the value score of a card placed in a cell to increase. Note that this increase happens regardless of which player owns the cell. So if the Red player increases the value of a cell and a Blue player’s card ends up there, the Blue player benefits!
To allow us to create such cards, we update the format of the influence grid in the deck configuration file with a new letter: U will represent that new influence type. An example card with this influence follows:
Mu 2 1
XXXXX
XXXUX
XXCIX
XXIXX
XXXXX
2.2 Devaluing
The devaluing influence also does not add pawns to a cell, but instead decreased the present or future value of that cell by 1. This decrease only effects the row-score when a card has been placed in that cell (that includes if the card was already placed there). This naturally decreases the row-score of that card’s owner by 1. Devaluing influence from multiple cards do stack, allowing the value score of a card placed in that cell (and therefore the row-score of its owner) to decrease even further. If a card’s value ends up as 0 or less, the following happens:
The card contributes 0 points to the row-score, even if the value ends up as less than that.
The card is then removed from the board and its pawn cost is left in that cell as pawns. Those new pawns are owned by the player that owned the original card in that cell.
Any increases or decreases from other influences exerted on that cell are removed. In other words, the cell now adds +0 to a future card’s value until another upgrading or devaluing influence affects it.
Any influence the removed card exerted on the board remains in effect. This means any cells that were claimed or had their number of pawns increase are not reverted. Similarly, value scores that were increased or decreased by that card remain increased or decreased.
To allow us to create such cards, we update the format of the influence grid in the deck configuration file with a new letter: D will represent thatnew influence type. An example card with this influence follows:
Flame 1 3
XXXXX
XDIXX
XDCXX
XDIXX
XXXXX
2.3 Both at once
Naturally, these influences can interact with each other on the same cell. For example, if two upgrading influence cells and one devaluing influence cell affect the same cell on the board, then the value only increases by +1. As another example, if one upgrading influence cell and three devaluing influence cells affect the same cell on the board, then the value only decreases by -2.
These new influence types must be available all times. This means if you read a deck configuration file with upgrade or devaluing influence cells, the new influence rules will work. This also means that if you read a deck configuration file without one of the new influence cells or with none of the new influence cells, then the game should run as expected.
2.4 Demoing
You must implement a textual view that shows the necessary information so we can quickly visualize the results of using your model.
2.5 Design
For proper design, both your variant model and your regular model must implement the same model interface(s), and must coexist in your code without e.g. commenting one out and recompiling the other. There must be another model for the design as we should be able to declare a model object that can’t play with the new influence types. As with all models, this new functionality must be decently tested.
Note that your old model does not have to support this new type of influence. If someone tries to play with your old model using the new influence, the old model can throw an exception, crash, ignore the new influence, or do anything.
However, your strategies must be able to work flawlessly without knowing if the model is your original or variant. In other words, your strategies should not need to know there is a new model involved and still correctly decide the best move according to their algorithm.
3 Level 2: Visualizing New Influence
In this level, you will create a view for your variant model from Level 1.
Any cells or cards affected by the new influence types will have the bonus/loss to their value printed on the board.
The influence grids on cards display the new types of influence they exert. You will explain in the README how that is visualized.
What follows is an example of such a display showing all requirements at once. In this image, a darker green is used to visualize an upgrading influence and a brighter purple is used to visualize a devaluing influence.
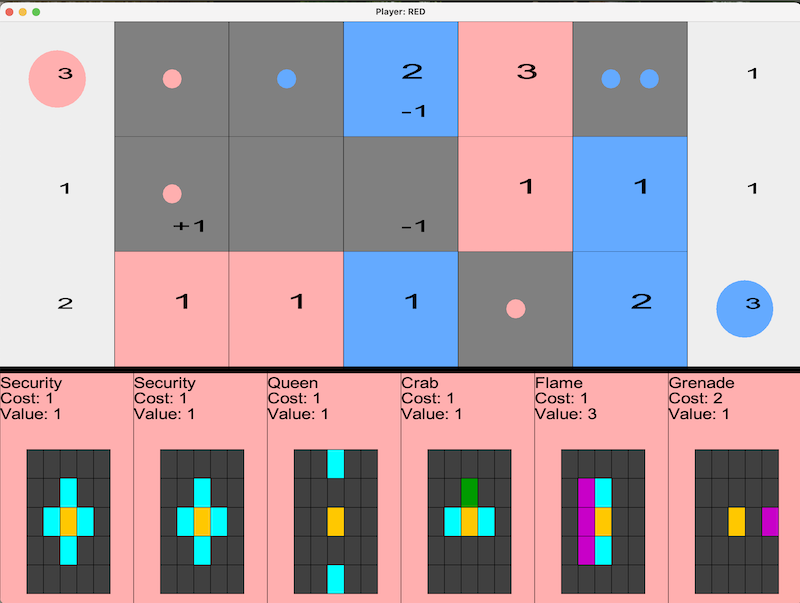
How you choose to represent this visually is up to you, but it must be immediately clear to a user what the effects of the new influence types are and how they appear on the influece grids.
For proper design, this new view should merely be an extension of the previous view. In other words, aside from making some methods or fields available to another class, your existing rendering code should change very little.
This does not have to work alongside Level 0 for full credit.
4 Evaluation
You will demo your work to the instructional staff. Please come to your demo slot prepared. You should not have to modify your source code during the demo to demonstrate features (e.g. if you have all four levels working, but you must comment them in or out to demonstrate them, that is not acceptable). Re-running your program with different command-line options to show different levels is acceptable.
You will explain the architectural changes you made to the instructor or TA who is grading you.
You will submit your code to the handin server before you are scheduled for your demo. Please include a readme file explaining which features you implemented and which files were affected, so the grader can quickly orient themselves when you arrive.
5 Grading standards
This assignment will be graded out of a total of 12 points:
1pt automated code style (earned only if you demo, no points for simply submitting something!)
Level 0: 2pts (1pt if the feature works flawlessly, 1pt if it is well designed)
Level 1: 3pts (1pt if the feature works flawlessly, 1pt if it is well designed, 1 pt if it is reasonably tested)
Level 2: 2pts (1pt if the feature works flawlessly, 1pt if it is well designed
Each of these individual grade items are all-or-none. In particular, clean code that is not properly functioning will not receive those points; likewise correctly functioning code that is poorly designed will not receive those points. As stated above, to receive credit for a feature, it must work completely. Two half-finished feature levels are worth zero points. Focus your attention on making each part of this assignment work well, rather than spreading yourselves too thin across several incomplete features.