Assignment 6: Save the Date – Planner System, part 2
Due dates:
Implementation: Wed, Mar 27 at 8:59pm
Self-evaluation: Thurs, Mar 28 at 11:59pm
Starter files: code.zip
1 Purpose
In this portion of the project, you will be building a visual view of your planner. This assignment has several parts. Look over the outline on the left, and skim through the whole assignment, before diving deeply into any one section. The assignment lists requirements in the recommended order you should do them, but future tasks might give you ideas for how to improve earlier ones.
2 Preparation: fixing up your models
2.1 Making your models read-only
As we discussed in class, views should not have the ability to mutate the models they are viewing: this would bypass the controller, making it impossible to reliably control the model.
Refactor your model interface, if necessary, into two interfaces: your
main PlannerModel interface (or whatever you named it) should now extend a
ReadonlyPlannerModel interface (again, choose a name that matches your
existing model). The read-only interface should contain all the observation
methods of your model, while the mutable sub-interface should contain all the
mutator methods.
2.2 Adding missing functionality
The following is a non-exhaustive checklist of functionality that is necessary for your NUPlanner to work properly. Your model interface(s) may not yet expose all of these as methods, or might not make it easy to use.
Model setup:
The ability to create a model without any schedules
The ability to create a model with some list of valid schedules
Observations:
What users (or user names) are in the planner?
Does some event conflict with the existing schedules for all of the event’s invited users?
What are the events in a given user’s schedule?
Operations:
Create/add an event (for one user or all invited users)
Remove an event from a user’s schedule
Add a schedule to the system
Modify events already in a schedule.
Reexamine the design and implementation of your model from the previous
assignment, and improve it to include the functionality above. Document
whatever changes you made in a new section of your README, entitled
“Changes for part 2” —
3 Visualizing the planner
To implement your view, you will need to use Java Swing. (You are not
permitted to use the javalib library we used in Fundies 2, as it
conflates the notions of model, view and controller into a single World
class. You are also not permitted to use JavaFX, as that has been deprecated
and is overly complicated as well.) The code provided with the
MVC code and the
Turtles activity from class
give you a basic beginning using Swing, as well as the exercises in Lab 7.
You will likely need to look up documentation on
Graphicsclass, and you may need to explicitly castGraphicsobjects toGraphics2Dobjects. Also look at the “transform” methods available in theGraphics2Dclass to use the rendering canvas appropriately.You will need to set the layout manager for the frames and maybe some panels to avoid having components pile on top of each other. You will find documentation about the existing layout managers and example code for them on this page from Oracle.
If you want a refresher on more of the components, but in text form, take a look at this page from Oracle on components. If you want it in video form, some students have sworn by this video, but keep in mind the creator does not separate listeners and view from the controller.
Swing defines three template methods by which you can customize the size of panels or frames:
getMinimumSize,getPreferredSizeandgetMaximumSize. Of these, the most common to override isgetPreferredSize.
You will need to create two frames for this project, one for an event and one for the schedule and main system.
You will likely need to design at least two or four interfaces for your view:
one to describe what the main system’s frame (and therefore the whole view) is capable of
one to describe what the event’s frame is capable of
one might be needed to describe what the schedule panel ought to be capable of
one might be needed to describe what the event frame’s panel ought to be capable of
(These may be empty interfaces for now, if you do not see a need for any methods in them yet...but keep reading below for additional ideas.) Note that your textual rendering from the previous assignment does not have to implement this new GUI view interface, and you do not have to force it to do so.
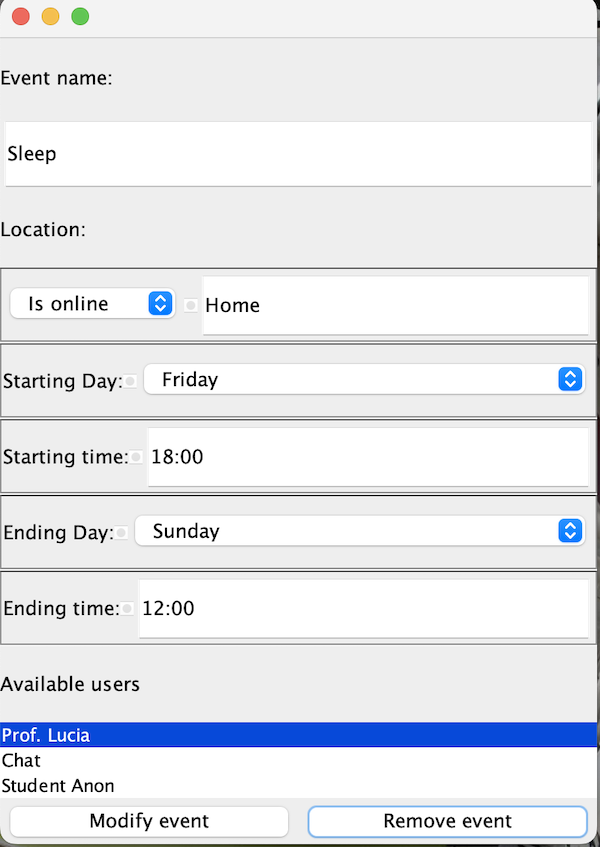
3.1 The event frame
This frame is how the client will be creating/modifying/or removing events. Your view needs to somehow expose all the relevant information for an event. The screenshot below from the previous assignment is an example of such a frame
![]()
Notice that the starting time and ending time take in any string, allowing the client to enter any time they wish, not just certain intervals like in calendar applications you may be familiar with. We assume these times are all 24 hour time (00:00 to 23:59).
The bottom most non-button component in the example picture is a list of all existing users. This example uses a JList which allows us to select any number of elements in the list. You may find that class helpful.
There should be some buttons to create, modify, or remove an event. Note this implementation changes the buttons visible based on the context the frame was created, but yours should have all 3 buttons available. 1With the patterns and concepts we have learned, it should not be difficult to replicate that behavior, but for the purpose of keeping this assignment feasible, we ask you not to try that.
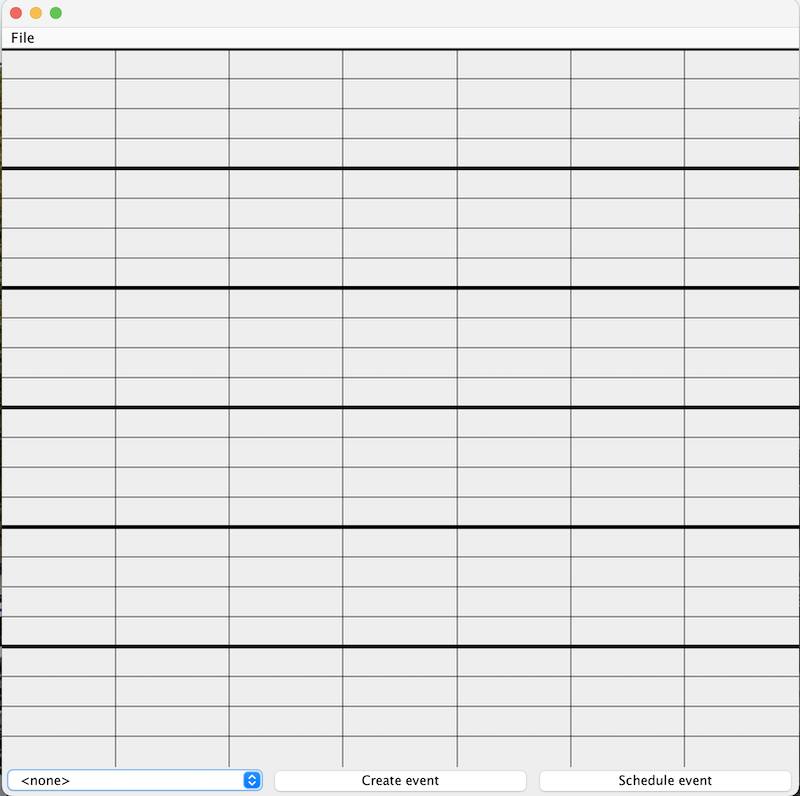
3.2 The main system/schedule frame
This frame is how the client will work with your main system. Your view should look as much as possible like the screenshots shown in the previous assignment:
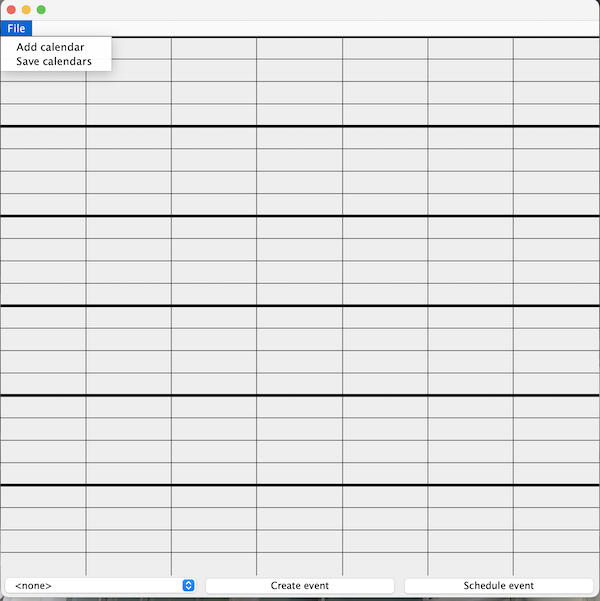
Note that this view has a File menu (thanks to JMenu and JMenuItem), which contains two items: one to load an XML file and another to save every loaded schedule chosen to individual XML files. Your view must expose that functionality, but it can be with buttons instead of a menu.
We will assume that this frame (and therefore your own) shows the days in order from left to right, from Sunday to Saturday. (In other words, the week starts on Sunday). The bold lines are drawn every four hours (starting at midnight) to make it easier to discern when events start.
When a schedule is loaded and a user with a schedule selected, the view looks as follows, where the red boxes are the events from the schedule, placed at locations corresponding to the start and end of events. This particular view is the result of loading the Prof. Lucia schedule from the previous assignment.
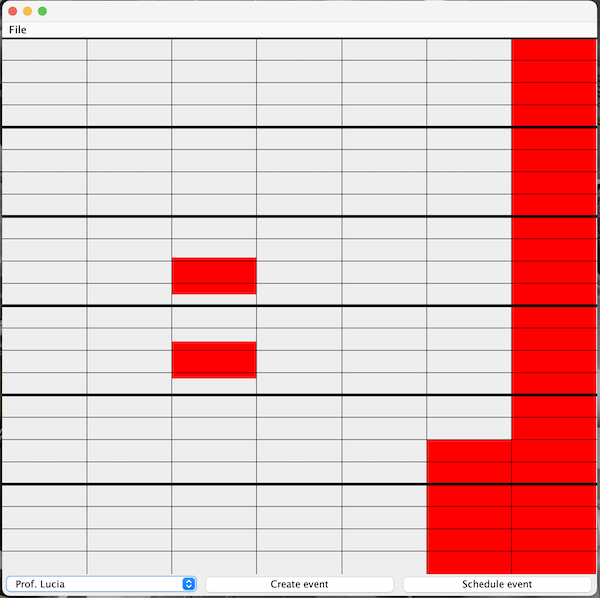
Notice how the start and end time of the events dictate the length and location of the events on the view. You will need to consider that translation in your own drawing method. You will notice as well that multi day events (the final "Sleep" event in this example) will result in multiple boxes. Finally, events that span into the next week are not fully shown here. They are shown up to Saturday 23:59 and then stop. In other words, those events do not wrap around on the planner.
You may adjust the color palette, or replace the menu with more buttons elsewhere, or use something instead of the JComboBox for the drop down list, but the schedule itself must look as above with the black lines (bold lines optional, but I found them helpful) and some colored box for the events themselves.
Looking through the documentation of the Graphics2D class, you’ll find
several useful methods for drawing text, lines, ovals, images, and shapes; and
for transforming the coordinate system (scaling, translating and rotating) to
affect where drawings are placed.
3.3 Required behavior
Your view should have a constructor that takes in a ReadonlyPlannerModel
—
In preparation for the next assignment (where you will build controllers), you should equip your view with the ability to handle specific events. We will discuss each window’s events separately.
3.3.1 Behaviors for the Event Frame
Once all the information is given to the frame for an event, clicking on the "Create" button should print a message (using
System.out) with the words "Create event:" and containing all the details the user entered in the frame. Note that the user of the currently selected schedule would be the host of the event.Clicking "Remove event" should print a message with the words "Remove event:" and containing the details of the event to remove, including the user you are removing it from. Note that would be the user of the currently selected schedule.
Clicking on the red button to close the window should DISPOSE the window. In other words, the program does not exit, but the window still closes and nothing else happens.
Clicking on either the "Create" button or "Remove" button without all the information should print a message stating some kind of error. What that error message contains is up to you.
3.3.2 Behaviors for the Main System Window
First, a client should be able to load in an XML file. For this assignment, you shouldn't actually
load them. Instead, whether you use a menu item
or a button, that item should open a JFileChooser window to allow the user to find and
select the XML. Then print the path to that XML file (again, using System.out).
The client should be able to choose the schedule to see (in the picture in this assignment, they are chosen from the drop down menu) and their schedule should be visible. (Note this should not require a controller to do so). The view should now look something like the following picture:
Once a schedule is visible, clicking on any event on the frame should open the Event Frame with all fields filled in by the current event’s information. Below is an example of such an event frame.
The client should be able to save the visible schedule to an XML file. every loaded schedule to their own XML files. For this assignment, you shouldn't actually save them. Instead, whether you use a menu item or a button, that item should open a JFileChooser window to pick the folder to save the file to. Then print the path to that directory to the console.
Attempting to add/create an event (by clicking a button for instance) should open an empty event frame.
Finally, clicking on the button to schedule an event should (for the time being) open an event frame as well. (We will slightly edit this frame for in the next assignment and that will involve very little change in code.)
You may want to revisit the discussion of Features interfaces from
Lecture 15: GUI Basics, and this may influence your view interface designs.
3.4 Running your view
Add the following placeholder class to your project. Note this assumes your project is in the packages cs3500.planner, so change the first line accordingly.
package cs3500.planner;

public final class PlannerRunner {
  public static void main(String[] args) {
    YourModel model = ...create an example model...
    YourView view = new YourView(model);
    view.setVisible(true);
  }
}
As we’ve done several times, our main() method simply instantiates a
model, instantiates a view using that model, and tells the view to get started.
In later assignments we will augment this to create the controller.
3.5 Testing your view
Testing views can be quite tricky, since you cannot simply use JUnit assertions to check them for “equality”. For this assignment, you do not need to unit-test your visual view, but you should include in your submission at least three screenshots of your view:
The main system’s view at the very beginning, with nothing loaded in
A picture of the event frame (with or without event details)
The main system’s view with a schedule with events visible
Name the screenshots appropriately, so you and graders can easily tell what they represent.
4 What to do
Refactor your model to split it into read-only and mutable interfaces.
Design your view interfaces, and then begin implementing your views.
Update your README file to include explanations of all the new classes you’ve designed. Be sure to include a “Changes for part 2” section documenting what you changed from your initial design.
5 What to submit
Submit all your source and test files so far
Submit your updated README file
Submit the three screenshots demonstrating your view works as intended
Submit a JAR file (with extension
.jar) that can run your program.
To create a JAR file, do the following:
Go to File -> Project Structure -> Project Settings -> Artifacts
Click on the plus sign
Choose
JAR-> From Modules with dependencies. You should now see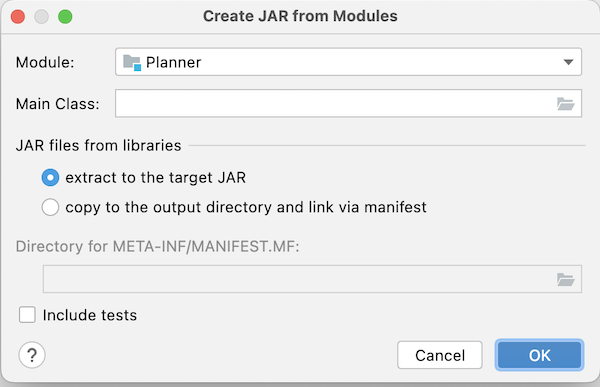
Select the main class of your program (where you defined the
main(String[] args)method)If you see a checkbox labelled “Include in project build”, check it.
Hit ok
You should now see something like
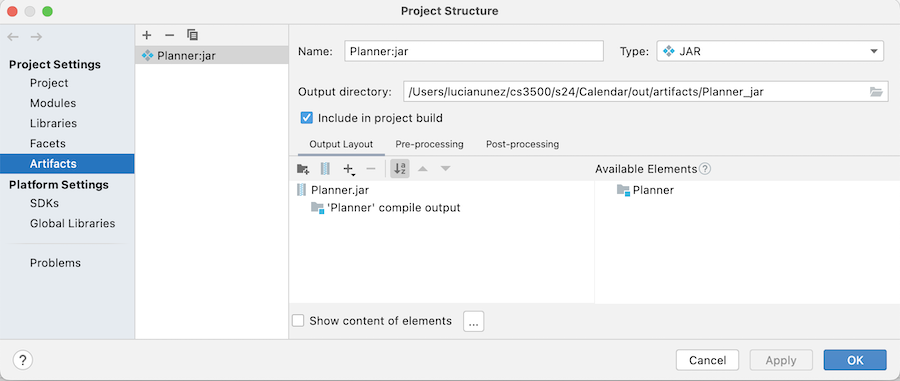
If now you see a checkbox labelled “Include in project build”, check it now.
Make your project (the button to the left of the run configurations dropdown, with the ones and zeros and a down-arrow on it). Your
.jarfile should now be in<projectRoot>/out/artifacts/.Verify that your jar file works. To do this, copy the jar file to some other folder. Now open a command-prompt/terminal and navigate to that folder. Now type
java -jar NameOfJARFile.jarand press ENTER. Your view should launch. If instead you get errors review the above procedure to create the JAR file correctly. Do not try merely double-clicking on your JAR, as that does not work consistently on different operating systems.
6 Grading standards
For this assignment, you will be graded on
the design of your view and strategy interfaces, in terms of clarity, flexibility, and how plausibly they will support needed functionality;
how well you justify any changes made to your model;
the forward thinking in your design, in terms of its flexibility, use of abstraction, etc.;
the correctness and style of your implementation, and;
the comprehensiveness and correctness of your test coverage.
7 Submission
Please submit your homework to https://handins.ccs.neu.edu/ by the above deadline. Then be sure to complete your self evaluation by its due date.
1With the patterns and concepts we have learned, it should not be difficult to replicate that behavior, but for the purpose of keeping this assignment feasible, we ask you not to try that.