Assignment 5: Save the Date – Planner System, part 1
Due dates:
Implementation: Thursday, Mar 14 at 8:59pm
Self-evaluation: Friday, Mar 15 at 11:59pm
Starter files: code.zip
This assignment is to be completed with a partner. You must be signed up
with a partner on Handins from this assignment onward. You will not be able to
submit this and subsequent assignments until you are part of a team on Handins.
If you do not know (or remember) how to request teams, follow
these
instructions. Please request teams no later than the start of homework 5,
which is Feb 26 —
Note that you will need to work with your partner to submit the self-eval. As with the code, one partner will submit a single self-eval for the team. However, you will likely need to sit with your partner or be on the phone as you should agree on all the responses.
1 Purpose
In this project, you will be building a weekly planner system for multiple users and a graphical interface. The design and implementation of this game is left open-ended, for you to figure out, explain, and justify. There will be several components to this project, so do not assume that everything in your code must neatly be described as either “model”, “view”, or “controller”.
2 NUPlanner System
The EXPECTED USE CASE for the planner: Details on the use case. Anything outside of this use case, unless this assignment states it, is up to you to decide on. Document that decision in your code somewhere.
2.1 Weekly Planner
The NUPlanner is a system where someone can visualize multiple users’ schedules and manipulate events on them. The initial planner system looks like this:
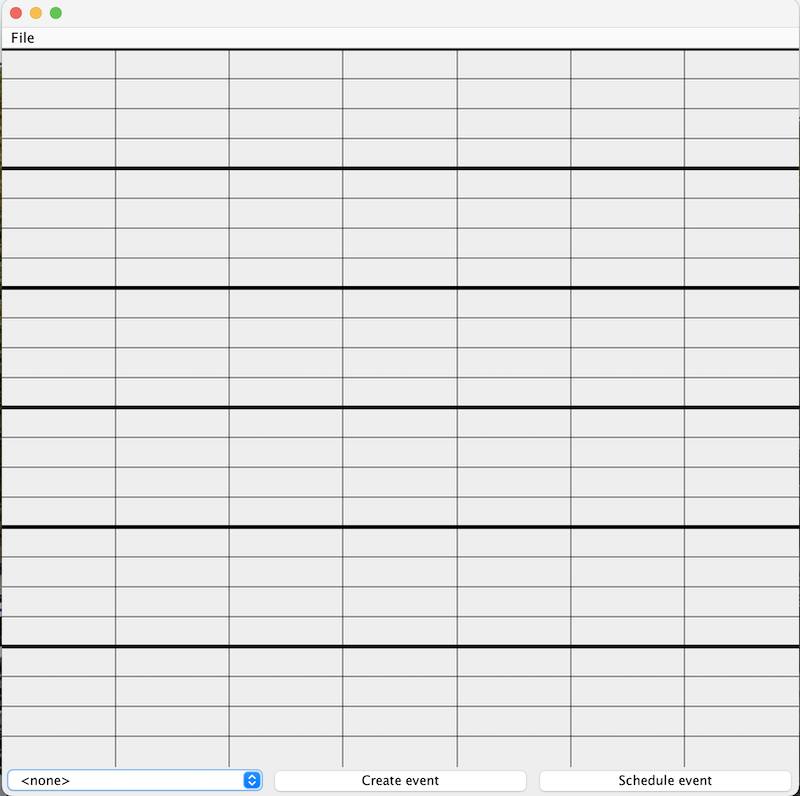
The system allows the user to do the following
Upload an XML file representing a single user’s schedule.
Save each user’s schedule to an XML file.
Select one of the users to display their schedule.
Create, modify, or remove an event on a user’s schedule, which may affect other user’s schedule.
Have the program automatically schedule an event on some users’ schedules at some time if possible.
See events occurring at a given time for the given user.
Each action will be explained in detail below.
2.1.1 Events
Events are everything in the system. Each event needs the following information at bare minimum to be present in the planner.
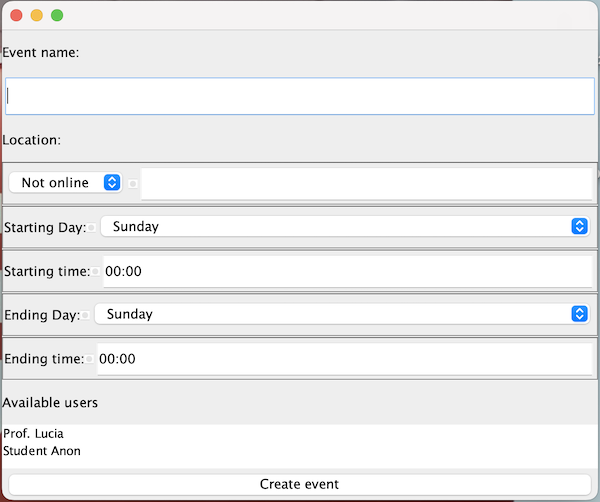
A name for the event as decided by the user.
A location and whether this event is also online or not.
The starting day and time of the event. Time is only up to minute granularity. That is, no seconds or smaller. Only hours and minutes.
The ending day and time of the event.
The user hosting the event.
A list of users who are invited into the event.
In a normal planner, an event could span multiple weeks. However, in the NUPlanner, an event can only span at most one week. In other words, if an event starts on Saturday, but ends on Tuesday, we assume that is the Tuesday after the current week.
Note that an event can have both a physical location AND still be online. Our lectures are an example of this.
An event that starts on Wednesday at 1600 and ends Wednesday 1559 is the longest event possible. This is an event that spans 6 days, 23 hours, and 59 minutes.
All events are assumed to start on the same week. See this Piazza post for the relevant question.
2.1.2 Users and Schedules
Each user has a schedule of their own. Schedules hold all of the events the user is currently invited to. A user can always add, modify, or remove events from their schedule. All edits to the event are then made visible to all invitees.
We are not concerned right now with a malicious user modifying an event they are not the host of. However, this is something worth considering in your design.
Finally, each schedule can only hold at most one event at a given time. This prevents the user from accidentally double-booking themselves at a given time. However, two events on the same schedule are allowed to overlap in one condition: the first ends at the same time the other starts.
We assume each user has exactly one schedule.
2.1.3 The main system
The central system of the NUPlanner is the main entry point of the system. This central system keeps track of all users and their individual schedules and ensures all events between schedules are consistent. From here, events can be created, modified, or even removed. It is the job of the central system to make sure all invited users get events added or removed from their schedules. The central system must also ensure any modification of an existing event is consistent in every invited user’s schedule. This part also ensures if the host of an event has their event removed, every invited user’s schedule is also updated to remove the event. If the user removes an event that they are not hosting, then the event is only removed from their schedule. Naturally the events must be updated to remove the invitee. However, there should be no issues if a user invited to an event does not exist in the system because the current instance of the system might only have some of the users loaded in.
We will assume all user names (or uid) are unique for ease. We are also creating a system based on trust. This means any user can modify events, regardless if they are hosts of the event or not. In other words, there is no distinct power a user has in the system. If a user wishes to interact with the system, they have the same privilege as a client. 1I consider permissions beyond the scope of this project.
2.1.4 Reading and Writing Schedules to File
First, let’s talk about XML, or eXtended Markup Language. In XML, much like HTML, there are tags, words surrounded by angle-brackets, which are used to organize hierarchical data into elements. Each element has a start tag (e.g. <html>) and an end tag (e.g. </html>) and anything between those tags are called the value of the element. In most cases, the value of an element is zero or more other elements, called children. Each element can also have attributes in their tags, like a field for a class. These attributes appear in the starting tag of an element. The name of the attribute is followed by an equals character and then the value of the attribute. For example "<paragraph style="strong">" is a paragraph element with one attribute, style, which has the value "strong".
To facilitate portability between different implementations of the NUPlanner, a specific file format was devised to represent schedules in a file. You can see an example of that format below:
<?xml version="1.0"?>
<schedule id="Prof. Lucia">
        <event>
                <name>CS3500 Morning Lecture</name>
                <time>
                        <start-day>Tuesday</start-day>
                        <start>0950</start>
                        <end-day>Tuesday</end-day>
                        <end>1130</end>
                </time>
                <location>
                        <online>false</online>
                        <place>Churchill Hall 101</place>
                </location>
                <users>
                        <uid>Prof. Lucia</uid>
                        <uid>Student Anon</uid>
                        <uid>Chat</uid>
                </users>
        </event>
        <event>
                <name>CS3500 Afternoon Lecture</name>
                <time>
                        <start-day>Tuesday</start-day>
                        <start>1335</start>
                        <end-day>Tuesday</end-day>
                        <end>1515</end>
                </time>
                <location>
                        <online>false</online>
                        <place>Churchill Hall 101</place>
                </location>
                <users>
                        <uid>Prof. Lucia</uid>
                        <uid>Chat</uid>
                </users>
        </event>
        <event>
                <name>Sleep</name>
                <time>
                        <start-day>Friday</start-day>
                        <start>1800</start>
                        <end-day>Sunday</end-day>
                        <end>1200</end>
                </time>
                <location>
                        <online>true</online>
                        <place>Home</place>
                </location>
                <users>
                        <uid>Prof. Lucia</uid>
                </users>
        </event>
</schedule>
The format of a schedule XML file does not care about the indentation, only the individual elements present. The first line is a tag used for programs that read XML to know this is indeed XML and what version of XML to read this as.
The version number of XML is like the version number of Java. Different versions can have different features. We only want the most basic version for simplicity.
What follows are the definitions of each element in our format.
The schedule element represents an existing schedule. The attribute "id" within the tag states the user that owns this schedule. This element contains zero or more event elements as children.
The event element represents a single event in the schedule. Each event element’s children are a non-empty list of the following elements. Each of those elements must appear exactly once unless otherwise stated. You may assume the elements below are always given to you in the order they are presented (like in the example).
The name element represents the name of the event. It’s value is a string.
The time element represents the duration of the event. There are four mandatory children for this element
The start-day element represents which day of the week the event starts. Its value is one of the seven weekdays starting with a capital letter as a string.
The start-time element represents the time of the event on that given day. Its value is a 4 digit number where the first 2 numbers are the number of hours in 24-hour time and the last 2 numbers are the number of minutes within the hour. For instance "2005" is the same as saying "8:05PM" where as "0903" is the same as saying "9:05AM". Notice that time is only in minute granulariy (meaning no seconds, just hours and minutes).
The end-day element represents which day of the week the event ends. It’s value is one of the seven weekdays starting with a capital letter.
The end-time element represents the time the event ends on the given end-day. It has the same value format as the start-time tag.
The location element represents the location of the event. There are two children for this element:
The online element represents whether the event is also online. It has one of two values: "true" or "false", spelled in this exact way.
The place element represents the location of the event. It’s value is a string.
The users element details the users invited to the event. This must be followed by at least one uid element as a tag. The uid element’s value is the name of a user. The first user in the list is considered the host of the event. Note that not all users must be present for the event to be valid in a written schedule.
The purpose of introducing this file format is to allow clients to upload user schedules into the system or save them. This allows for not only easy setup client side and for saving work on schedules, but also facilitates easier testing of the system.
3 Architectural choices
Note: We will have the noun "user" represent the schedule owner as we have above, while we have the noun "client" represent the being interacting with the system as a whole (i.e. the person sitting at the computer clicking buttons)
This system has a singular visualization which can change depending on the user the client wishes to display and interact with to change a schedule for users. Along with that, a central system must exist to ensure the events created, modified, or removed are properly updated in all schedules, including ones the client is not looking at.
In our setting, the schedule and central system, which comprise part of our model in a many-to-one relationship: many schedule exist within one central system. An event and the schedules also share a similar relationship: an event can exist in many schedules. Consider this relationship as you design your codebase.
There are multiple ways to view the schedule and central system; we will discuss two below.
Depending on how both are viewed, we might want to design different controllers for them.
And then there are the automatic event schedulers, which are not part of the model, view, or controller. These schedulers make decisions on when events should take place, so they have a different interface than anything we have discussed so far.
3.1 Modeling the schedule and the central system
You will need to represent the schedule and its contents. You likely will have to figure out how to represent events and blocks of time. Consider carefully how you choose to represent time. If your design is too strict, it will make comparisons of different blocks of time difficult. It your design is too free, you risk allowing invalid values of time to enter the system. Also consider the graphical visualization shown in a later section as time does play a part in how you will visualize an event.
You will need to figure out how to let users add, modify, and remove events from the schedule as well. Your implementation will need to (among other tasks) enforce the limitations of events discussed earlier.
You will need to do the same for the central system as it has different responsibilities for the same behaviors, alongside adding new schedules to the system.
Hint: your primary model interface may not be all that complicated. As with all our design tasks so far, consider all the nouns you notice in this game’s description, and all the verbs describing their interactions, observations, or mutations, and those become your interfaces and methods.
Hint: your interfaces and classes in general may not be too complicated and that is okay. Keep cohesion in mind: singular purpose per class and delegate appropriately to reduce complexity.
Hint: when it comes to thinking about overlapping events, start simple. Figure out how to detect if two events are overlapping if they are on the same day, then expand to events that end on the same week (in one Sunday - Saturday span), then expand further to dealing with weeks that would go beyond the week (e.g. starts on Friday, ends on Tuesday). Each step adds complexity, but will not only make it easier to handle each step, but also reveal how your representation of events and time can be improved (or why they are already great).
3.2 Visualizing the central system
You are not required in this assignment to create a GUI view of your game. Instead, you will start with a simpler textual view, similar to the previous project, to make it easier to see the interim progress of your game. Your text view needs to list each user, their schedule, and notable event details in some way so we can tell at a glance everything is correctly set up. For example, consider the visual and textual views here where the system only has Prof. Lucia’s schedule.
Visual view |
| Textual view |
|
| User: Prof. Lucia
Sunday:
Monday:
Tuesday:
name: CS3500 Morning Lecture
time: Tuesday: 950 -> Tuesday: 1130
location: Churchill Hall 101
online: false
invitees: Prof. Lucia
Student Anon
Chat
name: CS3500 Afternoon Lecture
time: Tuesday: 1335 -> Tuesday: 1515
location: Churchill Hall 101
online: false
invitees: Prof. Lucia
Chat
Wednesday:
Thursday:
Friday:
name: Sleep
time: Friday: 1800 -> Sunday: 1200
location: Home
online: true
invitees: Prof. Lucia
Saturday: |
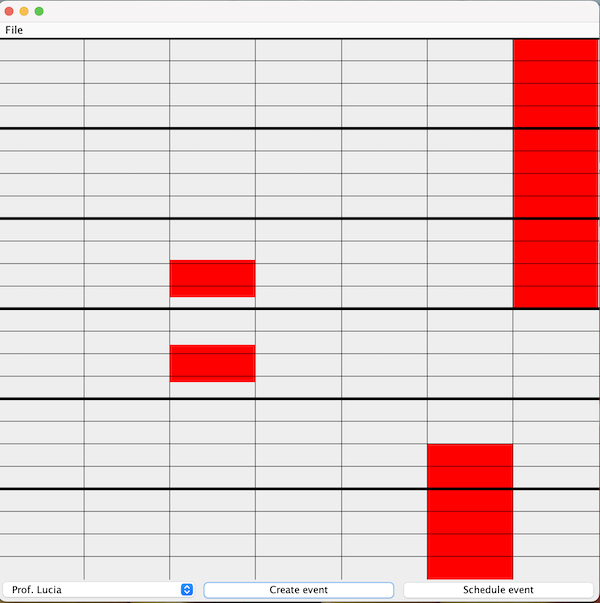
If the system has two or more users, you will get the following views. Note that the visual view is only interested in Prof. Lucia’s schedule where as the textual view gives us all of them.
Visual view |
| Textual view |
|
| User: Prof. Lucia
Sunday:
Monday:
Tuesday:
name: CS3500 Morning Lecture
time: Tuesday: 950 -> Tuesday: 1130
location: Churchill Hall 101
online: false
invitees: Prof. Lucia
Student Anon
Chat
name: CS3500 Afternoon Lecture
time: Tuesday: 1335 -> Tuesday: 1515
location: Churchill Hall 101
online: false
invitees: Prof. Lucia
Chat
Wednesday:
Thursday:
Friday:
name: Sleep
time: Friday: 1800 -> Sunday: 1200
location: Home
online: true
invitees: Prof. Lucia
Saturday:
User: Student Anon
Sunday:
Monday:
Tuesday:
name: CS3500 Morning Lecture
time: Tuesday: 950 -> Tuesday: 1130
location: Churchill Hall 101
online: false
invitees: Prof. Lucia
Student Anon
Chat
Wednesday:
Thursday:
Friday:
Saturday:
name: Party
time: Saturday: 1930 -> Saturday: 2110
location: Wherever the party is
online: true
invitees: Student Anon. |
3.3 Reading and writing XML
From a design standpoint, think very carefully about who bears the responsibility to read XML from the user and who bears the responsibility to interpret the XML.
From an implementation standpoint, parsing XML can be tricky to do by hand. Luckily, the JDK (the Java development kit) we use has some built in classes to represent, parse, and write XML. We will be using those classes and parsers to assist us so we don’t have to read XML by hand.
Please don’t try to write your own parser. Take a compilers course or a programming languages course to learn more about that.
For most of you, this will be your first time reading and writing files, let alone with an existing format. To assist, I have added a zip file of code and XML files to assist you. You will find the following there:
A bare-bones XML file from a tutorial on reading XML using the Apache Xerces library (many ads so keep that in mind): link to tutorial
The schedule XML file above as a more complex example you can use to test your readers and writers.
Code to show you how I read from a file, write to a file, and both read and write XML. You will notice I do not use the XML library to write the XML. I found it personally easier to write the XML on my own in this case, especially because we wrote hierarchical data to a String format in Homework 1. You may find that approach helpful in figuring out how to do the same.
Alongside that tutorial I linked, you may also find the following classes helpful:
the File class, which includes information about paths
the FileWriter class. Keep in mind it has two methods that it inherits from other files:
writeandappend. Make sure you know their side-effects.
In this project we will assume all files are relative to the project’s location. That means if we are running code in IntelliJ, we start by assuming any path is just leading us to a file starting from the project’s folder. So if I look for a file in "docs/schedule.xml", then that means I’m actually looking for the file with absolute path "<path-to-project-directory>/docs/schedule.xml". Keep this in mind as you try to use the above classes and code.
When writing, each schedule should be saved to an individual file. Make sure each file name is unique to each user and easily identifiable. For instance, you could name the file "<username>-sched.xml" where "<username>" is the name of the user in question. You can also save them wherever you wish, but keep in mind that a future controller feature could be choosing a location to save the files to.
3.4 Controlling the model
You do not need to implement any sort of controller in this assignment, though
you are encouraged to think about how to do so —
4 Scheduling events automatically
In a future assignment, we will ask you to automatically schedule events for users. Keep this in mind as you design: something else may be using your interfaces to work with the central system to add or learn about events and conflicts, so design your behaviors accordingly.
If you want an example of this, open up Teams and invite your partner to an event. Notice how Teams tries to suggest times? That is an example of scheduling that is different from making an event from scratch.
5 What to do
Before we go to the todo list, remember that all implementation code must be at most 50 lines.
Design a model to represent the schedule and the central system. This may consist of one or more interfaces, abstract classes, concrete classes, enums, etc. Consider carefully what operations it should support, what invariants it assumes, etc. Also consider whether a class should be public (the client must know) or package-private (only the implementation needs to know). Your model implementation should be general enough for multiple board sizes.
You are required to identify and document at least one class invariant for the implementation of your main model class, and ensure that your implementation enforces it.
Document your model well. Be sure to document clearly what each type and method does, what purpose it serves and why it belongs in the model.
Write a README file (see below).
Implement your model. If some method of your model cannot be implemented because it requires details we have not yet provided, you may leave the method body blank for now —
but leave a comment inside the method body explaining why it’s empty and what details you’re waiting for. If your implementation makes additional assumptions about invariants (beyond those asserted by the interface), document them. Test your model thoroughly. You are encouraged to follow the class split from previous assignments: a ModelInterface-testing class that lives outside your model package, to ensure you’re testing the publicly visible signatures of your model, and an Implementation-testing class that lives inside your model package, that can test package-visible functionality that isn’t part of your model interface.
Implement the textual rendering of your model described above, so we can visualize your data. Leave enough comments in your code that TAs know how to use your code to produce a visualization of a model. Test your textual rendering.
You are required to read and write the XML files as described in this assignment. See this Piazza link forwhat to do if you think part of this functionality belongs in a different component.
We will not be autograding this assignment, but you should emulate the textual view output above as precisely as possible, as we will likely be looking at it on future assignments.
6 How to write a good README file
A good README file needs to quickly explain to the reader what the codebase’s overall purpose is, what its design is, and where to find relevant functionality within the codebase. (Just because your code organization is obvious to you does not mean it’s obvious to a newcomer to your code!)
A README file does not have to be long in order to be effective, but it does need to be better than merely formulaic.
README files need to be in a predictable place in your codebase, or else
readers won’t easily be able to find them. Typically, place them in the
topmost directory of your project, or in a toplevel docs/ directory.
Consider the following outline as a good starting point for your READMEs, and elaborate from here. This is not a verbatim requirement, but rather a launch-point for you to explain your code.
Overview: What problem is this codebase trying to solve? What high-level assumptions are made in the codebase, either about the background knowledge needed, about what forms of extensibility are envisioned or are out of scope, or about prerequisites for using this code?
Quick start: give a short snippet of code showing how a user might get started using this codebase.
Key components: Explain the highest-level components in your system, and what they do. It is trite and useless to merely say “The model represents the data in my system. The view represents the rendering of my system. ...” This is a waste of your time and the reader’s time. Describe which components “drive” the control-flow of your system, and which ones “are driven”.
Key subcomponents: Within each component, give an overview of the main nouns in your system, and why they exist and what they are used for.
Source organization: Either explain for each component where to find it in your codebase, or explain for each directory in your codebase what components it provides. Either way, supply the reader with a “map” to your codebase, so they can navigate around.
Notice that almost everything in the README file corresponds strongly with the purpose statements of classes and interfaces in your code, but probably does not get into the detailed purpose statements of methods in your code, invariants in your data definitions, etc. Those implementation details belong in Javadoc on the relevant code files. You may choose to mention some key methods as entry points into your code (perhaps in the Quick start section’s examples), but you should not overburden the README with such lower-level detail.
7 What to submit
Submit any files created in this assignment, along with your design document. Make certain you include your README file, which should give the graders an overview of what the purposes are for every class, interface, etc. that you include in your model, so that they can quickly get a high-level overview of your code. It does not replace the need for proper Javadoc!
8 Grading standards
For this assignment, you will be graded on
the design of your model interface(s), in terms of clarity, flexibility, and how plausibly it will support needed functionality;
the appropriateness of your representation choices for the data, and the adequacy of any documented class invariants (please comment on why you chose the representation you did in the code);
the forward thinking in your design, in terms of its flexibility, use of abstraction, etc.
the correctness and style of your implementation, and
the comprehensiveness and correctness of your test coverage.
9 Submission
Please submit your homework to https://handins.ccs.neu.edu/ by the above deadline. Then be sure to complete your self evaluation by its due date.