The Image Library
1.1 Images
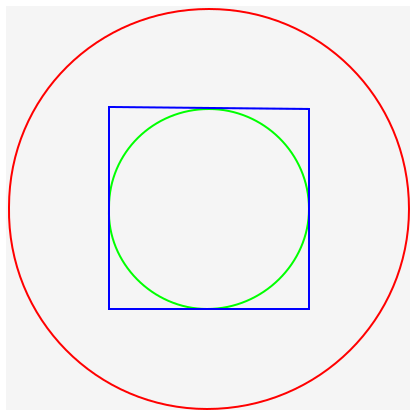
The javalib library provides a number of basic image classes, along with combinators for building more complex images out of existing images. Basic images include various polygons, ellipses and circles, and text, as well as bitmaps. Existing images can be rotated, scaled, flipped, and overlaid on top of each other.
(In fact, the background is drawn 1 pixel larger in each direction, so that any outlines or edges are more clearly seen.)
1.1.1 Basic image properties
Every image has a width and height, that can be obtained via the getWidth() and getHeight() methods.
Every image also has a bounding box, obtained by getBB(), representing the top-left and bottom-right corners of the image, in that image’s own coordinate system, which is a Cartesian system whose origin is at the image’s center, and whose y-axis points down.
Finally, every image has a pinhole, described further below.
1.1.2 Basic Images
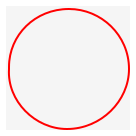
- new CircleImage(int radius, OutlineMode fill, Color color)Arguments:
int radius: the radius of this circle
OutlineMode fill: Either OutlineMode.OUTLINE or OutlineMode.SOLID
Color color: the color for this image
- new CircleImage(int radius, String fill, Color color)Arguments:
int radius: the radius of this circle
String fill: Either "outline" or "solid"
Color color: the color for this image
Constructs a circle with the given radius, mode, and color.
new CircleImage(30, OutlineMode.OUTLINE, Color.RED)

new CircleImage(20, OutlineMode.SOLID, Color.BLUE)
- new EllipseImage(int width, int height, OutlineMode fill, Color color)Arguments:
int width: the width of this ellipse
int height: the height of this ellipse
OutlineMode fill: Either OutlineMode.OUTLINE or OutlineMode.SOLID
Color color: the color for this image
- new EllipseImage(int width, int height, String fill, Color color)Arguments:
int width: the width of this ellipse
int height: the height of this ellipse
String fill: Either "outline" or "solid"
Color color: the color for this image
Constructs an ellipse with the given width, height, outline mode, and color.
new EllipseImage(60, 30, OutlineMode.OUTLINE, Color.BLACK)
new EllipseImage(30, 60, OutlineMode.SOLID, Color.BLUE)
- new LineImage(Posn endPoint, Color color)Arguments:
Posn endPoint: the end point of this line
Color color: the color for this image
Constructs a Line from the origin to the end point. The line will be the given color, and it will be recentered so that its internal "origin" is the center of the line.
new LineImage(new Posn(30, 30), Color.RED)
- new TextImage(String text, Color color)Arguments:
String text: the text to be shown
Color color: the color for this image
- new TextImage(String text, int size, Color color)Arguments:
String text: the text to be shown
int size: the size of the font to use (the default is 13)
Color color: the color for this image
- new TextImage(String text, float size, Color color)Arguments:
String text: the text to be shown
float size: the size of the font to use (the default is 13)
Color color: the color for this image
- new TextImage(String text, float size, FontStyle style, Color color)Arguments:
String text: the text to be shown
float size: the size of the font to use (the default is 13)
FontStyle style: the style of the font: FontStyle.REGULAR, FontStyle.BOLD, FontStyle.ITALIC or FontStyle.BOLD_ITALIC
Color color: the color for this image
Constructs an image that draws the given string, using the font size and color.
new TextImage("Hello", 24, FontStyle.BOLD, Color.RED)
new TextImage("Hello", 18, Color.BLACK)
new TextImage("Hello", Color.BLUE)
- new EmptyImage()Arguments:
Constructs an empty image (transparent image with no width or height). Useful as a base image to overlay onto.
1.1.3 Polygons
- new TriangleImage(Posn p1, Posn p2, Posn p3, OutlineMode fill, Color color)Arguments:
Posn p1: the first point of this triangle
Posn p2: the second point of this triangle
Posn p3: the third point of this triangle
OutlineMode fill: Either OutlineMode.OUTLINE or OutlineMode.SOLID
Color color: the color for this image
- new TriangleImage(Posn p1, Posn p2, Posn p3, String fill, Color color)Arguments:
Posn p1: the first point of this triangle
Posn p2: the second point of this triangle
Posn p3: the third point of this triangle
String fill: Either "outline" or "solid"
Color color: the color for this image
Constructs a triangle based on the three given points. The points are given relative to each other, and then the entire image is recentered so that its origin is the center of the triangle. The triangle will either be filled or an outline, and drawn with the specified color.
new TriangleImage(new Posn(0, 0), new Posn(0, 48), new Posn(36, 48), OutlineMode.SOLID, Color.BLACK)
- new EquilateralTriangleImage(double sideLen, OutlineMode fill, Color color)Arguments:
double sideLen: the length of one of the sides
OutlineMode fill: Either OutlineMode.OUTLINE or OutlineMode.SOLID
Color color: the color for this image
- new EquilateralTriangleImage(double sideLen, String fill, Color color)Arguments:
double sideLen: the length of one of the sides
String fill: Either "outline" or "solid"
Color color: the color for this image
Constructs an equilateral triangle with the given side length. The triangle will either be filled or an outline, drawn with the specified color.
new EquilateralTriangleImage(40, OutlineMode.SOLID, Color.GREEN)
- new RectangleImage(int width, int height, OutlineMode fill, Color color)Arguments:
int width: the width of this rectangle
int height: the height of this rectangle
OutlineMode fill: Either OutlineMode.OUTLINE or OutlineMode.SOLID
Color color: the color for this image
- new RectangleImage(int width, int height, String fill, Color color)Arguments:
int width: the width of this rectangle
int height: the height of this rectangle
String fill: Either "outline" or "solid"
Color color: the color for this image
Constructs a rectangle with the given width, height, fill, and color.
new RectangleImage(40, 20, OutlineMode.OUTLINE, Color.BLACK)
new RectangleImage(40, 20, OutlineMode.SOLID, Color.BLUE)
- new HexagonImage(double sideLen, OutlineMode fill, Color color)Arguments:
double sideLen: the length of one of the sides
OutlineMode fill: Either OutlineMode.OUTLINE or OutlineMode.SOLID
Color color: the color for this image
- new HexagonImage(double sideLen, String fill, Color color)Arguments:
double sideLen: the length of one of the sides
String fill: Either "outline" or "solid"
Color color: the color for this image
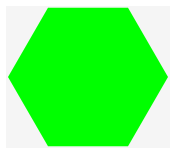
Constructs an equilateral hexagon with the given side length. The hexagon will either be filled or an outline, drawn with the specified color.
new HexagonImage(40, OutlineMode.SOLID, Color.GREEN)
- new RegularPolyImage(double sideLen, int numSides, OutlineMode fill, Color color)Arguments:
double sideLen: the length of one of the sides
int numSides: the number of sides of the polygon
OutlineMode fill: Either OutlineMode.OUTLINE or OutlineMode.SOLID
Color color: the color for this image
- new RegularPolyImage(double sideLen, int numSides, String fill, Color color)Arguments:
double sideLen: the length of one of the sides
int numSides: the number of sides of the polygon
String fill: Either "outline" or "solid"
Color color: the color for this image
- new RegularPolyImage(double length, LengthMode lengthMode, int numSides, OutlineMode fill, Color color)Arguments:
double length: the size of the image
LengthMode lengthMode: Either LengthMode.RADIUS or LengthMode.SIDE
int numSides: the number of sides of the polygon
OutlineMode fill: Either OutlineMode.OUTLINE or OutlineMode.SOLID
Color color: the color for this image
- new RegularPolyImage(double length, String lengthMode, int numSides, OutlineMode fill, Color color)Arguments:
double length: the size of the image
String lengthMode: Either "radius" or "side"
int numSides: the number of sides of the polygon
OutlineMode fill: Either OutlineMode.OUTLINE or OutlineMode.SOLID
Color color: the color for this image
- new RegularPolyImage(double length, LengthMode lengthMode, int numSides, String fill, Color color)Arguments:
double length: the size of the image
LengthMode lengthMode: Either LengthMode.RADIUS or LengthMode.SIDE
int numSides: the number of sides of the polygon
String fill: Either "outline" or "solid"
Color color: the color for this image
- new RegularPolyImage(double length, String lengthMode, int numSides, String fill, Color color)Arguments:
double length: the size of the image
String lengthMode: the interpretation of the length
int numSides: the number of sides of the polygon
String fill: Either "outline" or "solid"
Color color: the color for this image
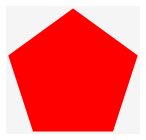
Constructs a regular equilateral polygon with the given side length. The polygon will either be filled or an outline, drawn with the specified color. If a length mode is specified, then the length argument will be interpreted either as the length of a side, or the radius of the circle containing the polygon.
new RegularPolyImage(40, 5, OutlineMode.SOLID, Color.RED)
new RegularPolyImage(30, 8, OutlineMode.OUTLINE, Color.BLUE)

new OverlayImage(new RegularPolyImage(100, LengthMode.SIDE, 4, OutlineMode.OUTLINE, Color.BLUE), new OverlayImage(new CircleImage(100, OutlineMode.OUTLINE, Color.RED), new CircleImage(50, OutlineMode.OUTLINE, Color.GREEN)))
new OverlayImage(new RegularPolyImage(100, LengthMode.RADIUS, 4, OutlineMode.OUTLINE, Color.BLUE), new OverlayImage(new CircleImage(100, OutlineMode.OUTLINE, Color.RED), new CircleImage(50, OutlineMode.OUTLINE, Color.GREEN)))

- new StarImage(double radius, OutlineMode fill, Color color)Arguments:
double radius: the radius of the containing circle
OutlineMode fill: Either OutlineMode.OUTLINE or OutlineMode.SOLID
Color color: the color for this image
- new StarImage(double radius, int numPoints, OutlineMode fill, Color color)Arguments:
double radius: the radius of the containing circle
int numPoints: the number of points of the star
OutlineMode fill: Either OutlineMode.OUTLINE or OutlineMode.SOLID
Color color: the color for this image
- new StarImage(double radius, int numPoints, int skipCount, String fill, Color color)Arguments:
double radius: the radius of the containing circle
int numPoints: the number of points of the star
int skipCount: how many points away is the "next" point of the star
String fill: Either "outline" or "solid"
Color color: the color for this image
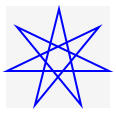
Constructs a regular star with the given radius. The star will either be filled or an outline, drawn with the specified color. By default, the star will have five points, and the sides will skip as far across the star as possible. If the skip-count is coprime to the number of points, there will be a single star component. If they are not coprime, then the star will break apart into multiple components (see the last image below).
new StarImage(50, OutlineMode.SOLID, Color.RED)

new StarImage(50, 7, OutlineMode.OUTLINE, Color.BLUE)
new StarImage(50, 7, 2, OutlineMode.OUTLINE, Color.GREEN)
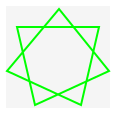
new StarImage(50, 8, 2, OutlineMode.SOlID, Color.ORANGE)

1.1.4 Overlaying Images
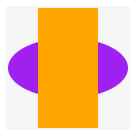
- new OverlayImage(WorldImage top, WorldImage bot)Arguments:
WorldImage top: the top image for the combined image
WorldImage bot: the bottom image for the combined image
Constructs a combined image with top image overlaid over the bottom image. The top image will be placed such that its pinhole aligns with the bottom image’s pinhole. For more information about pinholes, see Pinholes.
new OverlayImage(new RectangleImage(30, 60, OutlineMode.SOLID, Color.GREEN), new EllipseImage(60, 30, OutlineMode.SOLID, Color.PURPLE))
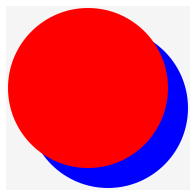
- new OverlayOffsetImage(WorldImage top, double dx, double dy, WorldImage bot)Arguments:
WorldImage top: the top image for the combined image
double dx: Amount to shift the bottom image along the X axis
double dy: Amount to shift the bottom image along the Y axis
WorldImage bot: the bottom image for the combined image
Constructs a combined image with top image overlaid over the bottom image. The top image will be placed such that its pinhole aligns with the bottom image’s pinhole. For more information about pinholes, see Pinholes. The bottom image will then be offset by dx and dy.
new OverlayOffsetImage(new CircleImage(40, OutlineMode.SOLID, Color.RED), 10, 10, new CircleImage(40, OutlineMode.SOLID, Color.BLUE))
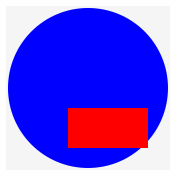
- new OverlayOffsetAlign(AlignModeX alignX, AlignModeY alignY, WorldImage top, double dx, double dy, WorldImage bot)Arguments:
AlignModeX alignX: The alignment on the X axis to be used as a starting point for overlaying the top image on the bottom
AlignModeY alignY: The alignment on the Y axis to be used as a starting point for overlaying the top image on the bottom
WorldImage top: the top image for the combined image
double dx: Amount to shift the bottom image along the X axis
double dy: Amount to shift the bottom image along the Y axis
WorldImage bot: the bottom image for the combined image
- new OverlayOffsetAlign(String alignX, String alignY, WorldImage top, double dx, double dy, WorldImage bot)Arguments:
String alignX: The alignment on the X axis to be used as a starting point for overlaying the top image on the bottom
String alignY: The alignment on the Y axis to be used as as starting point for overlaying the top image on the bottom
WorldImage top: the top image for the combined image
double dx: Amount to shift the bottom image along the X axis
double dy: Amount to shift the bottom image along the Y axis
WorldImage bot: the bottom image for the combined image
Constructs a combined image with top image overlaid over the bottom image. AlignX and alignY are used as starting points for the overlay, then the bottom image will be offset by dx and dy.
new OverlayOffsetAlign(AlignModeX.RIGHT, AlignModeY.BOTTOM, new RectangleImage(40, 20, OutlineMode.SOLID, Color.RED), 10, 10, new CircleImage(40, OutlineMode.SOLID, Color.BLUE))
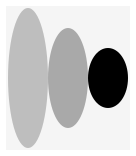
- new BesideImage(WorldImage im1, WorldImage... ims)Arguments:
WorldImage im1: the leftmost image
WorldImage... ims: the right image(s)
Constructs an image by placing all of the image arguments in a horizontal row, aligned along their pinholes.
new BesideImage(new EllipseImage(20, 70, OutlineMode.SOLID, Color.GRAY), new EllipseImage(20, 50, OutlineMode.SOLID, Color.DARK_GRAY), new EllipseImage(20, 30, OutlineMode.SOLID, Color.BLACK))
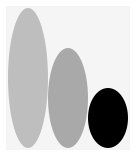
- new BesideAlignImage(AlignModeY mode, WorldImage im1, WorldImage... ims)Arguments:
AlignModeY mode: Alignment along the Y axis. Top, bottom, middle, pinhole
WorldImage im1: the left image for the combined image
WorldImage... ims: the right image(s) for the combined image
- new BesideAlignImage(String mode, WorldImage im1, WorldImage... ims)Arguments:
String mode: Alignment along the Y axis. Top, bottom, middle, pinhole
WorldImage im1: the left image for the combined image
WorldImage... ims: the right image(s) for the combined image
Constructs an image by placing all of the image arguments in a horizontal row, lined up as indicated by the align mode of the Y axis.
new BesideAlignImage(AlignModeY.BOTTOM, new EllipseImage(20, 70, OutlineMode.SOLID, Color.GRAY), new EllipseImage(20, 50, OutlineMode.SOLID, Color.DARK_GRAY), new EllipseImage(20, 30, OutlineMode.SOLID, Color.BLACK))
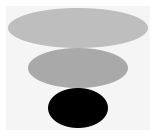
- new AboveImage(WorldImage im1, WorldImage... ims)Arguments:
WorldImage im1: the top image for the combined image
WorldImage... ims: the bottom image(s) for the combined image
Constructs an image by placing all of the image arguments in a vertical column, aligned along their pinholes.
new AboveImage(new EllipseImage(70, 20, OutlineMode.SOLID, Color.GRAY), new EllipseImage(50, 20, OutlineMode.SOLID, Color.DARK_GRAY), new EllipseImage(30, 20, OutlineMode.SOLID, Color.BLACK))
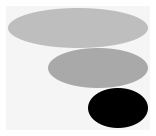
- new AboveAlignImage(AlignModeX mode, WorldImage im1, WorldImage... ims)Arguments:
AlignModeX mode: Alignment along the X axis. Left, right, center, pinhole
WorldImage im1: the top image for the combined image
WorldImage... ims: the bottom image(s) for the combined image
- new AboveAlignImage(String mode, WorldImage im1, WorldImage... ims)Arguments:
String mode: Alignment along the X axis. Left, right, center, pinhole
WorldImage im1: the top image for the combined image
WorldImage... ims: the bottom image(s) for the combined image
Constructs an image by placing all of the image arguments in a vertical column, aligned along the X axis as indicated by the specified mode.
new AboveAlignImage(AlignModeX.RIGHT, new EllipseImage(70, 20, OutlineMode.SOLID, Color.GRAY), new EllipseImage(50, 20, OutlineMode.SOLID, Color.DARK_GRAY), new EllipseImage(30, 20, OutlineMode.SOLID, Color.BLACK))
- new PhantomImage(WorldImage img)Arguments:
WorldImage img: Image to turn into a phantom image
- new PhantomImage(WorldImage img, int width, int height)Arguments:
WorldImage img: Image to turn into a phantom image
int width: the width of the phantom image
int height: the height of the phantom image image
A "phantom" image that has a default width and height of 0. In all respects other than width and height it delegates to the underlying image. The width and height can be specified with the full constructor.
1.1.5 Rotating, Scaling, Shearing, Cropping, and Framing images
- new RotateImage(WorldImage img, double rotationDegrees)Arguments:
WorldImage img: Image to rotate
double rotationDegrees: Degrees to rotate the image
Rotate the image by rotationDegrees in a clockwise direction.
new RotateImage(new EllipseImage(60, 20, OutlineMode.SOLID, Color.CYAN), 45)

- new ScaleImage(WorldImage img, double scale)Arguments:
WorldImage img: Image to scale
double scale: Scale factor
Scale the image by the given factor.
new ScaleImage(new EllipseImage(20, 40, OutlineMode.OUTLINE, Color.BLACK), 1.5)
- new ScaleImageXY(WorldImage img, double scaleX, double scaleY)Arguments:
WorldImage img: Image to scale
double scaleX: Scale factor on the X axis
double scaleY: Scale factor on the Y axis
Scale the image by the given factors in both the X and Y direction.
new ScaleImage(new EllipseImage(20, 40, OutlineMode.OUTLINE, Color.BLACK), 1.5, 0.5)
- new ShearedImage(WorldImage img, double scaleX, double scaleY)Arguments:
WorldImage img: Image to scale
double scaleX: Scale factor on the X axis
double scaleY: Scale factor on the Y axis
Shear the image by the given factors in both the X and Y direction.
new ShearedImage(new RectangleImage(60, 30, OutlineMode.SOLID, Color.BLUE), 0.5, 0.5)
- new CropImage(int x, int y, int width, int height, WorldImage img)Arguments:
int x: Upper left x coordinate of the crop location
int y: Upper left y coordinate of the crop location
int width: Width of the crop
int height: Height of the crop
WorldImage img: Image to crop
Crops img to the rectangle with the upper left at the point (x,y) and with width and height.
new CropImage(0, 0, 40, 40, new Circle(40, OutlineMode.SOLID, Color.BROWN))
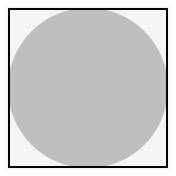
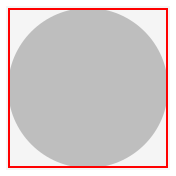
- new FrameImage(WorldImage img)Arguments:
WorldImage img: Image to frame
- new FrameImage(WorldImage img, Color color)Arguments:
WorldImage img: Image to frame
Color color: Color of the frame
Returns an image just like image, except with a single pixel frame drawn around the bounding box of the image. By default the frame is drawn in black, but you may specify an alternate color.
new FrameImage(new CircleImage(40, OutlineMode.SOLID, Color.GRAY))
new FrameImage(new CircleImage(40, OutlineMode.SOLID, Color.GRAY), Color.RED)
1.1.6 Bitmaps and Manipulating Individual Pixels
- new FromFileImage(String fileName)Arguments:
String fileName: The file name of the image source
Constructs an image from a source jpg or png. It reads the file from the root directory of the project.
- new FrozenImage(WorldImage img)Arguments:
WorldImage img: The image to freeze
Freezing an image internally builds a bitmap, draws the image into the bitmap and then uses the bitmap to draw that image afterwards. Typically this is used as a performance hint. When an image both contains many sub-images and is going to be drawn many times, freezing the image can substantially improve performance without changing how the image draws.
- new ComputedPixelImage(int width, int height)Arguments:
int width: The width of the image
int height: The height of the image
A ComputedPixelImage is intended to allow you to mutably compute the contents of an image, one pixel at a time. The constructor for this class creates an empty (i.e., completely transparent) image of the desired width and height. To manipulate the image, you use the following methods:
int x: The column of the pixel
int y: The row of the pixel
int x: The column of the pixel
int y: The row of the pixel
Returns the Color at the requested location, or throws an IndexOutOfBoundsException if the provided coordinates are not within the bounds of the picture. Both method names are provided, and they do the same thing, so use whichever is more intuitive.
int x: The column of the pixel
int y: The row of the pixel
Color c: The desired new color of the pixel
int x: The column of the pixel
int y: The row of the pixel
Color c: The desired new color of the pixel
Sets the requested pixel to the provided Color, or throws an IndexOutOfBoundsException if the provided coordinates are not within the bounds of the picture. Both method names are provided, and they do the same thing.
int x: The column of the pixel
int y: The row of the pixel
int width: The width of the pixel block
int height: The height of the pixel block
Color c: The desired new color of the pixel
Sets a rectangular block of pixels, with the top left corner specified by (x,y) and with the given width and height, to the provided color. If any of the requested pixels are out of range, throws an IndexOutOfBounds exception.
The getColorAt method can also be used with FromFileImages, FrozenImages and WorldCanvases, to get the colors of individual pixels there. For example, you could load a FromFileImage, create a ComputedPixelImage of the same size, and then loop over all the pixels in the file image to produce a new image that transforms each of the colors in some way (e.g., brightening or darkening them).
1.1.7 Saving images
- void saveImage(String fileName)Arguments:
String fileName: The name of the file to save
This method will produce a PNG image file that’s the same size as your image or scene. (For images, the file will be exactly as large as the image; for scenes, it will be the size of the scene regardless of what’s being drawn.)
1.1.8 Pinholes
Pinholes are used as guidepoints for overlaying images. OverlayImage will align each image’s pinhole, and OverlayOffsetAlign can be specified to align along pinholes. The pinhole can be moved via movePinhole and movePinholeTo. movePinhole will move the pinhole by an offset in each direction, while movePinholeTo will move the pinhole to the specified coordinates (measured with respect to the center of the current image). Both methods will create a new image with the moved pinhole; the original image is unchanged.
Note: This means you can use movePinholeTo(new Posn(0, 0)) to copy an image and reset its pinhole to the center of the image.
- new VisiblePinholeImage(WorldImage img)Arguments:
WorldImage img: The image to overlay the pinhole representation
- new VisiblePinholeImage(WorldImage img, Color color)Arguments:
WorldImage img: The image to overlay the pinhole representation
Color color: The color to draw the pinhole mark
This constructs an image that overlays a cross over the pinhole of the img. The resulting image has its pinhole in the same place, and is the same size as the underlying image, so that one can easily add or remove visible pinholes while debugging how images are drawn. By default, the pinhole is drawn in black, but you may specify an alternate color.
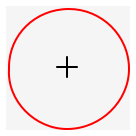
new CircleImage(30, OutlineMode.OUTLINE, Color.RED)
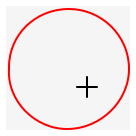
new VisiblePinholeImage(new CircleImage(30, OutlineMode.OUTLINE, Color.RED))
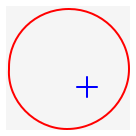
new VisiblePinholeImage(new CircleImage(30, OutlineMode.OUTLINE, Color.RED).movePinhole(10, 10))
new VisiblePinholeImage(new CircleImage(30, OutlineMode.OUTLINE, Color.RED).movePinhole(10, 10), Color.BLUE)
By default, pinholes are placed at the visual center of most images. For most images, this is the same as their physical center, but for polygons and stars with odd numbers of corners, the two positions are different:
new VisiblePinholeImage(new RegularPolyImage(30, 3, OutlineMode.OUTLINE, Color.RED), Color.BLUE)
new VisiblePinholeImage(new RegularPolyImage(30, 3, OutlineMode.OUTLINE, Color.RED).movePinholeTo(new Posn(0, 0)), Color.BLACK)
This placement makes the pinhole coincide with the center of the circle surrounding the polygon, rather than the center of its bounding box, so that rotating the polygon looks smooth rather than lopsided:
WorldImage triUp = new EquilateralTriangleImage(30, OutlineMode.OUTLINE, Color.RED); WorldImage triDown = new RotateImage(new EquilateralTriangleImage(30, OutlineMode.OUTLINE, Color.BLUE), 180); new OverlayOffsetAlign(AlignModeX.CENTER, AlignModeY.MIDDLE, triUp, 0, 0, triDown)
WorldImage triUp = new EquilateralTriangleImage(30, OutlineMode.OUTLINE, Color.RED); WorldImage triDown = new RotateImage(new EquilateralTriangleImage(30, OutlineMode.OUTLINE, Color.BLUE), 180); new OverlayOffsetAlign(AlignModeX.PINHOLE, AlignModeY.PINHOLE, triUp, 0, 0, triDown)
Note that pinholes do not affect the bounding box of an image. In particular, if two images have pinholes outside their bounding boxes, and are placed beside each other, this may look confusing:
WorldImage blueRect = new RectangleImage(30, 40, OutlineMode.SOLID, Color.BLUE).movePinhole(30, 40) new VisiblePinholeImage(blueRect, Color.BLUE)
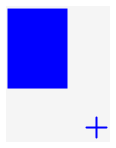
WorldImage redRect = new RectangleImage(30, 40, OutlineMode.SOLID, Color.RED).movePinhole(-30, 40) new VisiblePinholeImage(redRect, Color.RED)

new VisiblePinholeImage(new BesideImage(redRect, blueRect), Color.YELLOW)
There is no space between the two rectangles, despite where the pinholes are, and the resulting image’s pinhole is in the center of the image.
1.2 WorldScenes
- new WorldScene(int width, int height)Arguments:
int width: The width of the scene
int height: The height of the scene
WorldScene placeImageXY(WorldImage img, int x, int y)
that places the given image with its pinhole on the specified coordinates. It returns the enhanced scene. Parts of the image that extend beyond the scene boundaries will be cropped.
Use this method in sequence to place multiple images on a scene:
new WorldScene(width, height) .placeImageXY(image1, x1, y2) .placeImageXY(image2, x2, y2) ... .placeImageXY(imageN, xN, yN);
Or, build up a composite image (using any of the image constructions above) and place everything on the scene at once.
1.3 Worlds
- new World()Arguments:
1.3.1 makeScene
WorldScene makeScene()
This method must return the WorldScene to be shown on each clock tick.
1.3.2 bigBang
boolean bigBang(int width, int height, double speed)
Invoke bigBang on a World, passing in the intended width and height of the window to be opened. (This may be distinct from the size of the WorldScene being displayed; if so, the scene will be drawn in the upper-left corner of the window.)
Additionally, pass in a double representing the speed (in seconds) of the tick-rate. Only positive numbers will work; zero or negative numbers will be ignored and the clock will not tick.
As a convenience, merely to test that your code compiles and can display anything, bigBang is overridden to take just a width and height, and assumes a clock speed of zero.
Note: If you intend to specify an ending for the world, then your clock rate matters. If your clock rate is zero and therefore the clock does not tick, then you must use the endOfWorld method for ending the world, rather than the worldEnds method; see Ending the World below.
To kick off your program, you will likely write a simple test method that just invokes bigBang. It doesn’t actually call any test methods on the given Tester object, but it’s enough for the tester library to find and run for you:
class ExamplesMyWorldProgram { boolean testBigBang(Tester t) { MyWorld w = ... however you create your world ... int worldWidth = ...however wide you want the window to be... int worldHeight = ...however tall you want the window to be... double tickRate = ...however fast you want the tick rate to be (in seconds/frame)... return w.bigBang(worldWidth, worldHeight, tickRate); } }
1.3.3 getEmptyScene
WorldScene getEmptyScene()
This convenience method will return an empty scene sized to fit the current window. This may be easier to use than keeping the sizes of the window and the scene in synch in multiple places in your code.
1.3.4 Handlers
onTick() handles ticking the clock and updating the world.
onKeyEvent(String key) handles key input and is given the key that has been pressed.
onKeyReleased(String key) handles key released and is given the key that has been released.
onMouseClicked(Posn pos) handles mouse clicks and is given the mouse location.
onMouseEntered, onMouseExited, onMouseMoved, onMousePressed and onMouseReleased are analogous to onMouseClicked, but cover additional mouse behaviors.
You will almost always override onTick, and will likely override onKeyEvent and/or onMouseClicked.
1.3.4.1 Key handlers
Both the onKeyEvent and onKeyReleased events receive a key name describing the key that has been pressed or released. Key events may happen repeatedly, if the key is pressed and held down and that key isn’t just a modifier key (like Shift or Control).
A key press of "shift" or "right-shift"
A key press of "@"
A key release of "shift" or "right-shift"
A key release of "2"
If keys appear in both left and right forms (e.g. the shift keys), then they will be named "shift" and "right-shift", "control" and "right-control" etc. If keys appear both on the normal keyboard and the number pad, they will be named "0" and "numpad-0", etc.
"enter"
"delete"
"tab"
"shift"
"insert"
"home"
"page-up"
"page-down"
"delete"
"begin"
"end"
"num-lock"
"scroll-lock"
"escape"
"caps-lock"
"context-menu"
"f1"
"f2"
"f3"
"f4"
"f5"
"f6"
"f7"
"f8"
"f9"
"f10"
"f11"
"f12"
"up"
"down"
"left"
"right"
1.3.4.2 Mouse handlers
onMouseClicked(Posn pos) – when a mouse button is quickly pressed and released
onMousePressed(Posn pos) – when a mouse button is pressed
onMouseMoved(Posn pos) – when the mouse cursor is moved
onMouseReleased(Posn pos) – when a mouse button is released
onMouseEntered(Posn pos) – when a mouse is moved to enter the window
onMouseExited(Posn pos) – when a mouse is moved to exit the window
For each of these events, the Posn gives the coordinates of the mouse cursor, relative to the contents of the window.
onMouseClicked(Posn pos, String buttonName) – when a mouse button is quickly pressed and released, and which button is pressed
onMousePressed(Posn pos, String buttonName) – when a mouse button is pressed, and which button is pressed
onMouseMoved(Posn pos, String buttonName) – when the mouse cursor is moved, and which button is pressed
onMouseReleased(Posn pos, String buttonName) – when a mouse button is released, and which button is released
The buttonName argument will be one of "LeftButton", "MiddleButton" or "RightButton". (If no button is pressed, or if something unexpected happens, it will be "UnknownButton".)
Note that you should not override both versions (with and without the string argument) of any of these methods. If you need the mouse button, override these versions; if you do not care about buttons, use the simpler forms above.
1.3.5 Ending the World
When the game is over, you have two mechanisms for signaling the end of the world. The first of these two methods can be used no matter how your world program is running; the second can only be used when you have a clock that ticks.
1.3.5.1 endOfWorld and lastScene
The easier alternative is to return this.endOfWorld("A message") from any of your handlers (tick, keyboard, mouse, etc.). If this method is used, you should override
WorldScene lastScene(String msg)
to return the appropriate final scene to display to the user of your game. The msg parameter is whatever String is passed to endOfWorld. This approach is easier to use when deciding that the world has ended is cleanly split into each relevant handler.
1.3.5.2 worldEnds
For more isolated control, you can override
WorldEnd worldEnds()
This method returns a WorldEnd object, whose constructor takes two parameters: a boolean indicating whether the world has ended or not, and a WorldScene to be displayed (when the boolean flag is true). Typical overrides of this method will look roughly like
public WorldEnd worldEnds() { if (theGameIsOver) { return new WorldEnd(true, this.makeAFinalScene()); } else { return new WorldEnd(false, this.makeScene()); } }
(Note that the scene currently is ignored when the boolean flag is false.)
This approach is easier to use when deciding that the world has ended is better expressed in a single, consolidated place. However, the code must produce a WorldEnd object even when the world hasn’t ended. Also note: if the clock does not tick, then it is impossible to know when to call this worldEnds method: instead, you must use the endOfWorld approach above.
1.3.6 Funworld versus Impworld
There are two variants of the World library supplied to you:
The Funworld library is a pure library, where every method produces a new WorldScene or World as needed. All event handlers return a World.
The Impworld library is an imperative library, using side effects to modify the existing WorldScene or World. All event handlers return void. WorldScene is also imperative, so the placeImageXY method modifies the existing scene, rather than creating a new one.
Be sure to use the version of the library requested by each assignment!